Get In Touch
Jl. Gegerkalong Hilir, Sukarasa,
Kec. Sukasari,
Kota Bandung, Jawa Barat 40152
(021) 123 456 789
platform@telkomiot.id

Jl. Gegerkalong Hilir, Sukarasa,
Kec. Sukasari,
Kota Bandung, Jawa Barat 40152
(021) 123 456 789
platform@telkomiot.id
Telkom IoT Platform is an IoT technology service that can easily connect, manage, automate various devices or sensors, and visualize device data stored on personal dashboards that can be tailored to customer needs. With the Research & Innovation Collaboration business model, Telkom IoT Platform has a broad target market coverage such as academics, B2B to large institutions as users.
Telkom IoT Platform has several benefits for users:
As one of the main components in the Internet of Things (IoT) ecosystem and plays an important role as a bridge between data from sensor devices to dashboard data users.
From a business perspective to support various types of industry in facilitating IoT technology business processes and support development from conventional business models to digital business through technology evaluation.
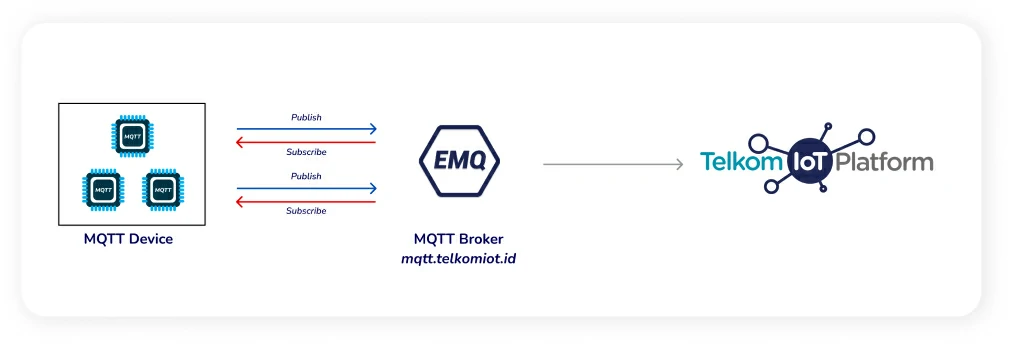
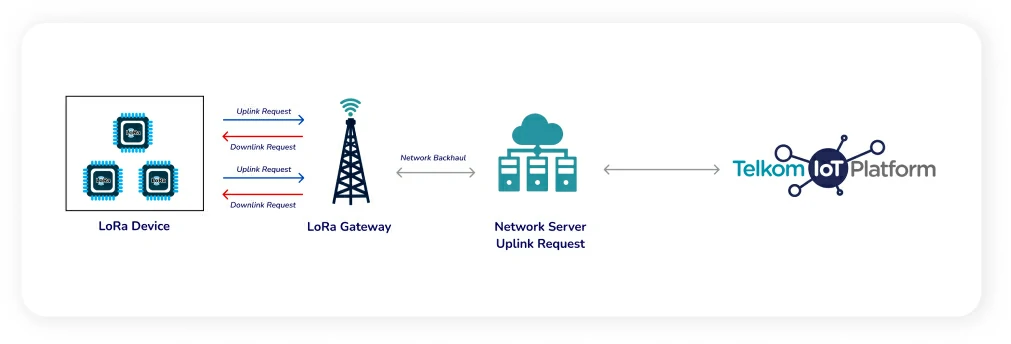
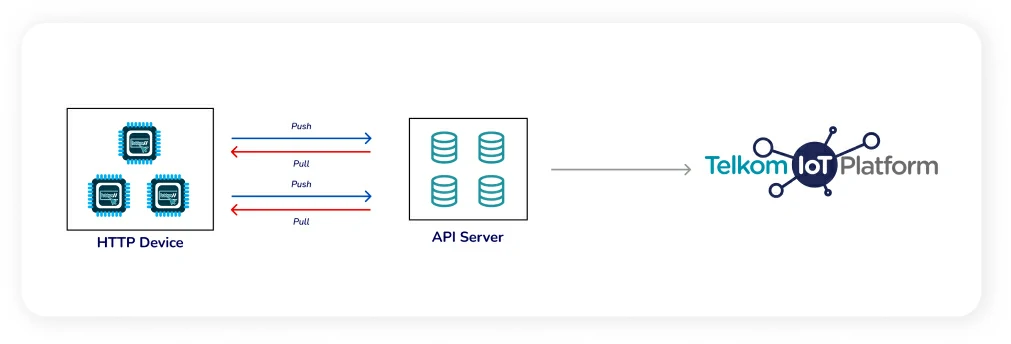
The following is architecture of Telkom IoT Platform:

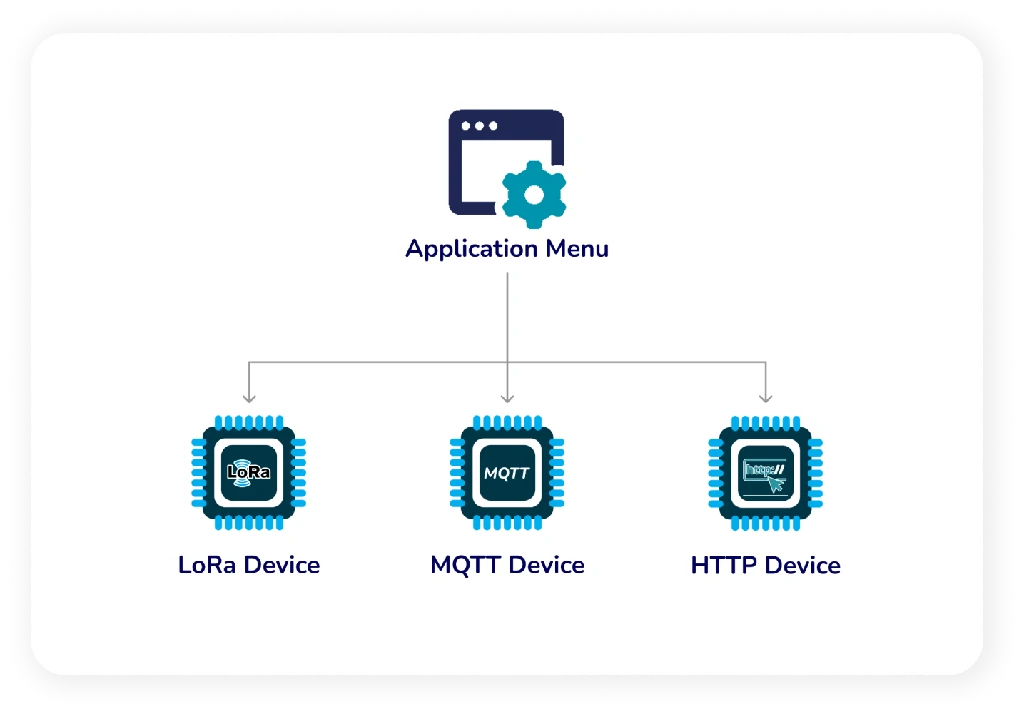
The picture above explains that Telkom IoT Platform uses three connectivity options such as LoRa, HTTP and MQTT.
Telkom IoT Platform is an IoT technology service that can easily connect, manage, automate various devices or sensors, and visualize device data stored on personal dashboards that can be tailored to customer needs. With the Research & Innovation Collaboration business model, Telkom IoT Platform has a broad target market coverage such as academics, B2B to large institutions as users.
Register your email, contact info, password and choose a category to get an account in Telkom IoT Platform. Every verified account will be given a free trial package and verification email will be sent to the user email address after submitting all data. Registration has two account categories such as Regular Account and B2B (Business to Business) Research and Innovation Collaboration.

Regular account is an account which is addressed for developers, students, individuals and business. Regular account registration requires some fields to be input, including :
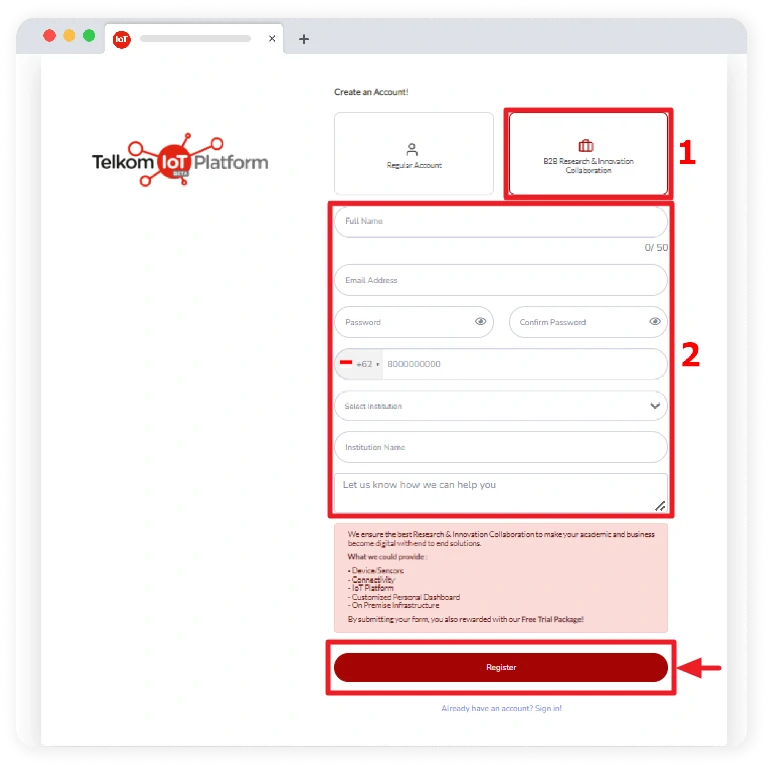
In the registration form, user must input data to fields. B2B Research & Innovation Collaboration category addressed for academics, companies, to big institutions that want to create innovation in IoT technology and develop business to digital and collaborate with the IoT Platform team and make their research and innovation as living lab. B2B account registration requires several fields that needs to be input, including :
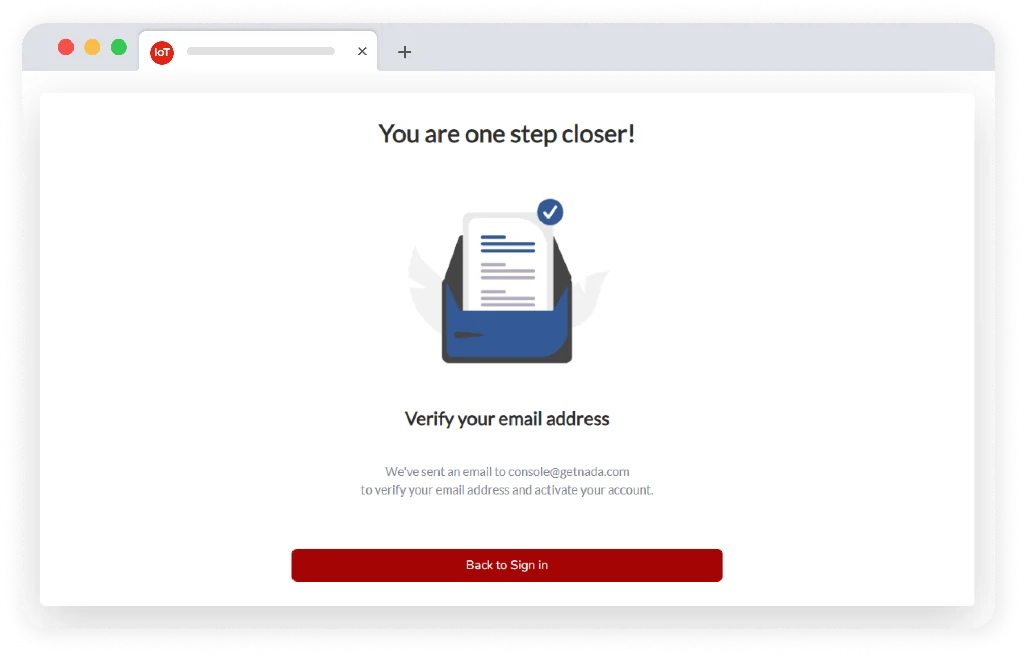
After user input and submit fields in registration form, user will receive an email with a verification link for the email address.
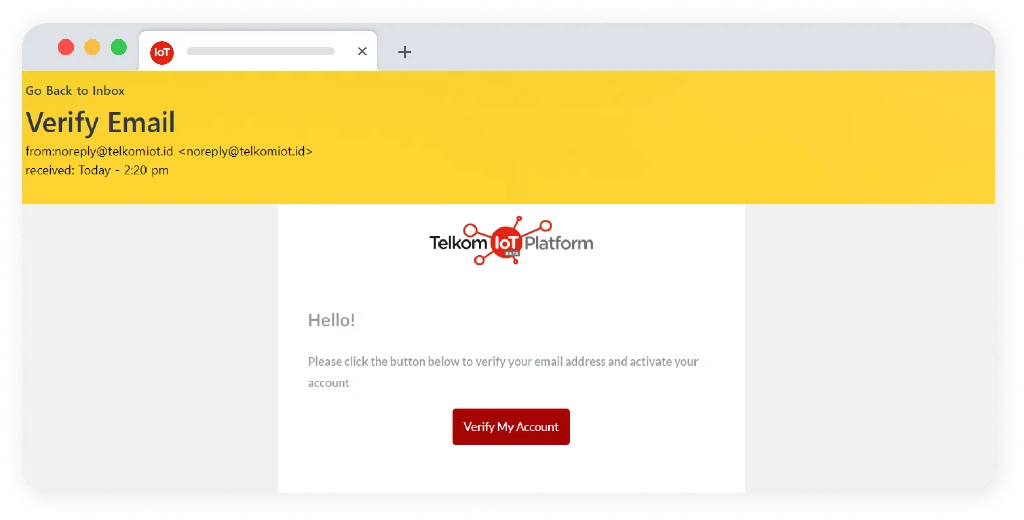
Verification link will be entered into each user's email inbox, and then user can click the verification link to continue to the next step.
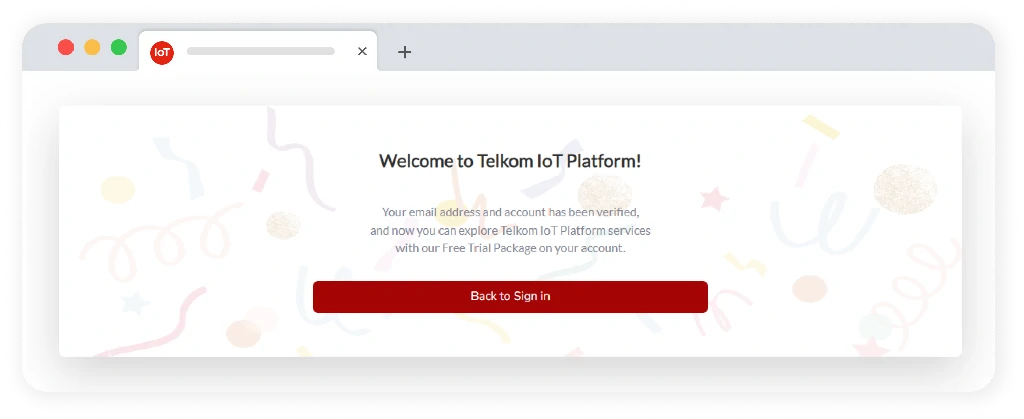
After the verification link is selected, users can use their account. User can Sign in with the registered email and password. With a verified account, user will get the opportunity to explore IoT Platform services for free by using Free Trial Package with benefits that can be seen in the user account details.
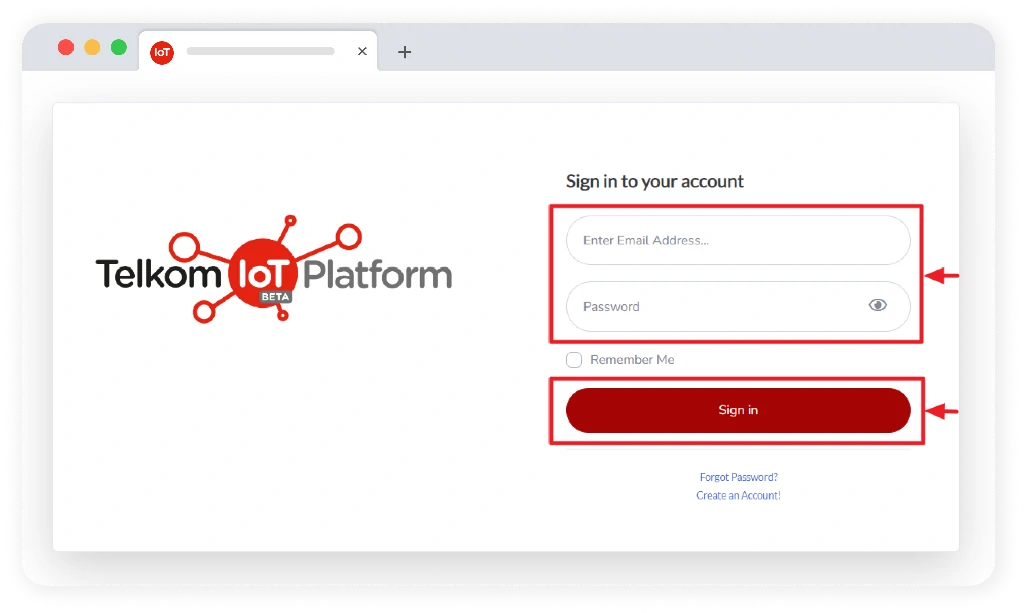
User who has successfully register an account on the registration page can Sign in and access the console by filling in the email and password fields.
The main view of the Telkom IoT Platform console after user successfully has an account and successfully performs the Sign in process. There is a summary display from the Account in the menu such as Platform Type, Active Until, Category, Application Summary (which includes application in use and device in use numbers) and Connectivity Type (number of devices connected to each connectivity).

User who has successfully register an account on the registration page can Sign in and access the console by filling in the email and password fields.
Each user in the Telkom IoT Platform has several applications that have functions as device storage space. Each user can have more than one application depending on the package they have.
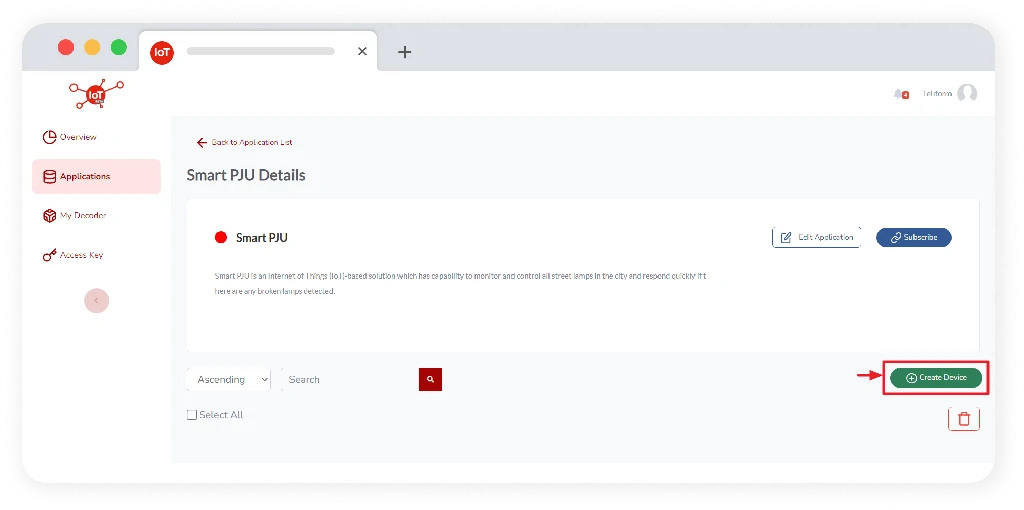
Every user who will create a device is required to have an application. User can select Application on Dashboard - Create Application.
.webp)
The following is a display of the inner field in Create Application:
.webp)
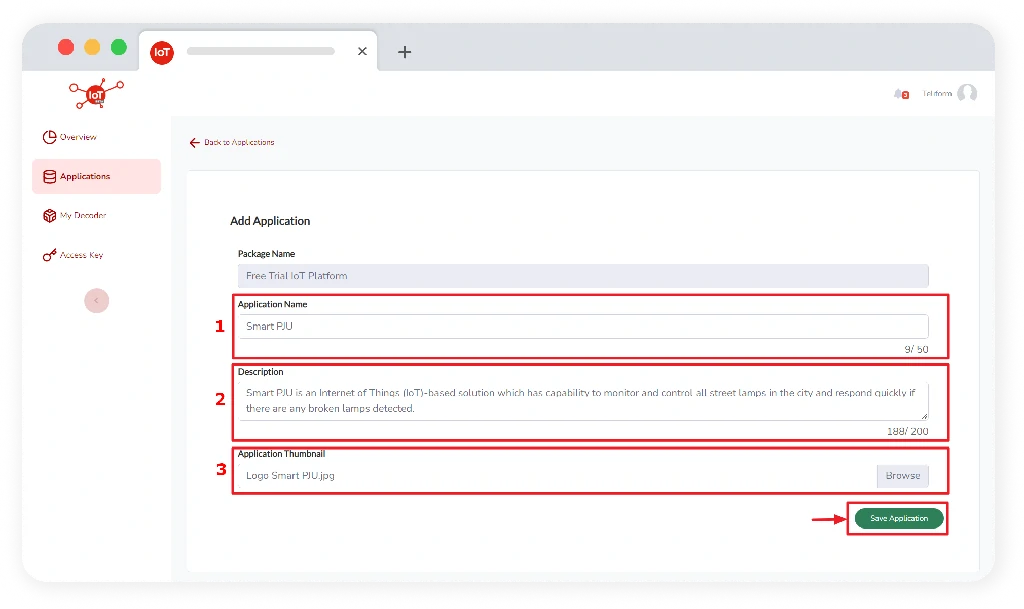
In application creation has several fields which are required to be entered, include:
In the package name there is a column containing the package name, it is set automatically by the system after registration it will become a Free Trial Package for the first use for new users.
Application name is filled with a field containing the name of the application with a minimum number of 3 characters and a maximum of 50 characters.
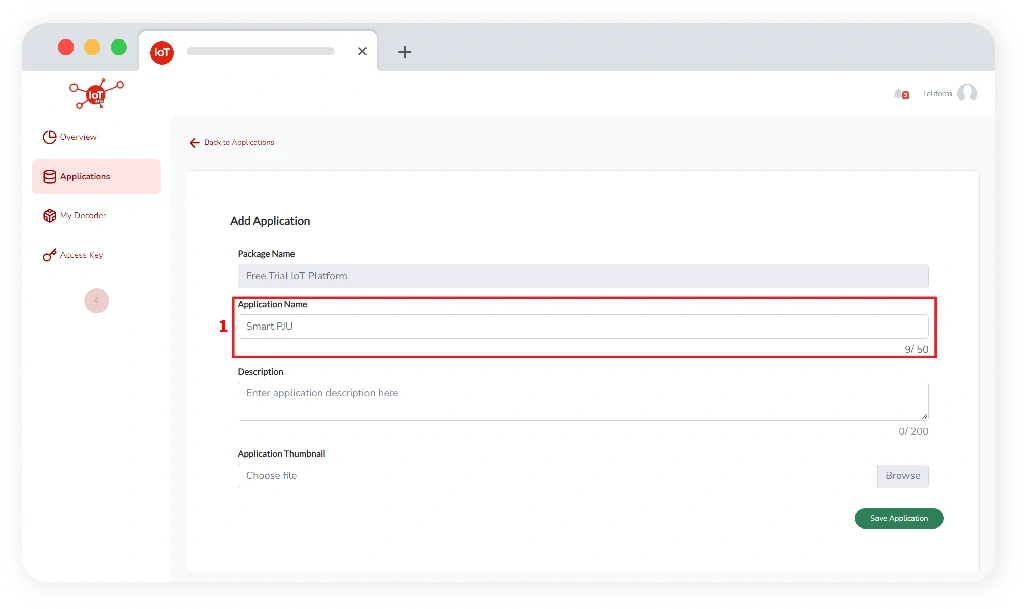
In the description section, users can fill in a field containing a description of the application with a maximum of 200 characters.
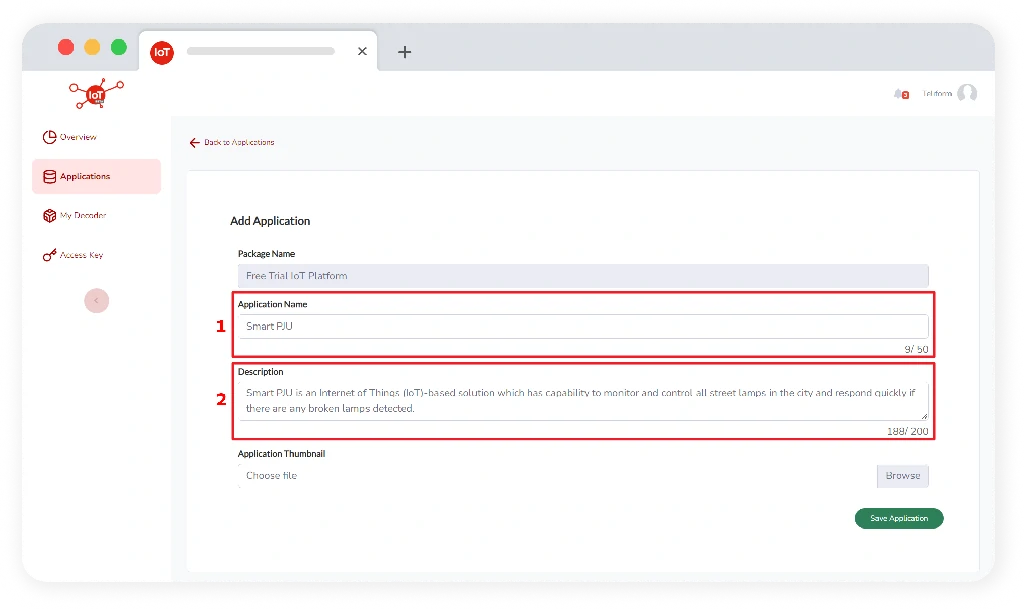
In the application thumbnail, the user can fill in the field containing the icon/logo with the following customized format: JPG, JPEG, PNG and a maximum size of 2MB icon/logo.
After the user has successfully created the application and already has the application list, the user can manage their application with the available Edit application. Here is how the Manage Edit application looks like: User can Edit app by following steps:
1. Select an application name to be processed for Update/Edit.
.webp)
2. Then select the Edit Application Menu.
.webp)
The user can input the selected field to be changed, then select the Edit Application menu.
.webp)
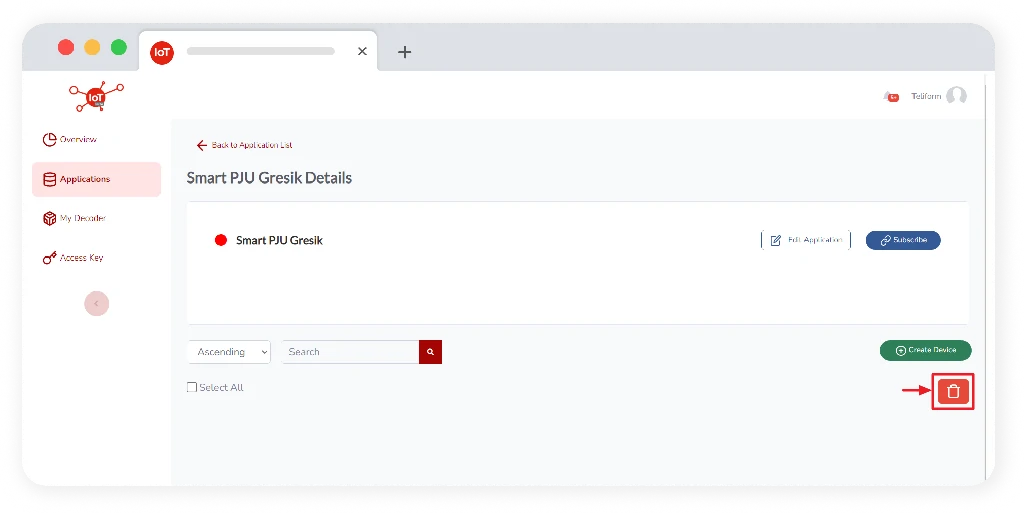
There are 3 types of application removal management that users can choose according to their needs, including the following:
Delete application menu, user can delete applications manually or choose one by one.
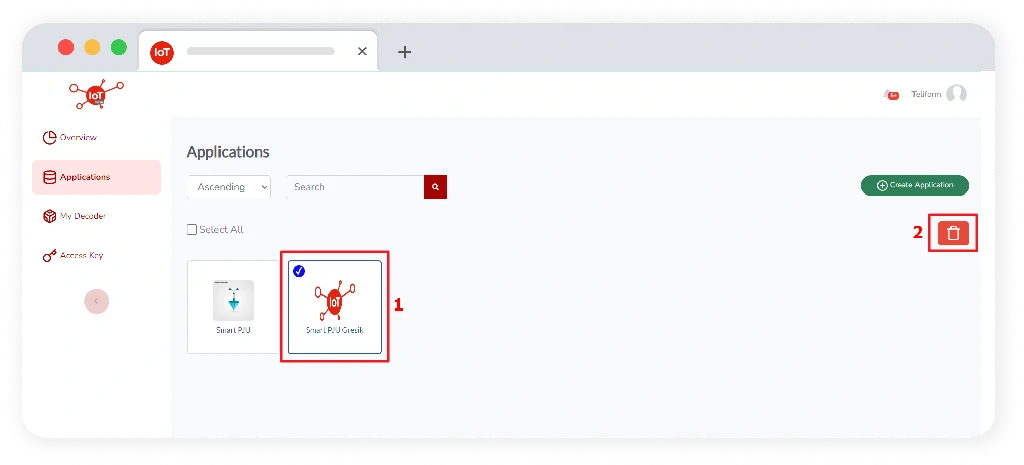
In the delete app menu, the user can delete more than one selected app/all apps.
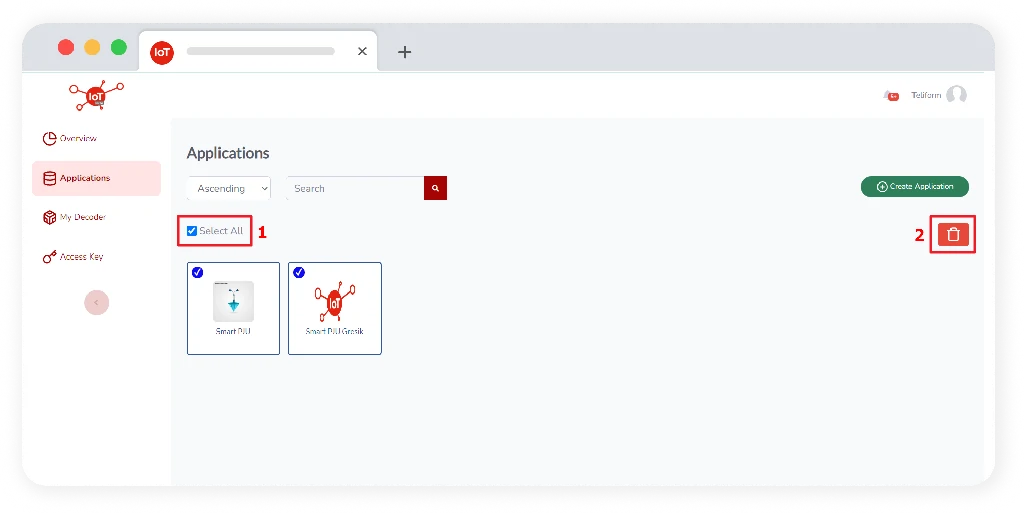
In the delete application menu, users can delete applications without having to own a device.
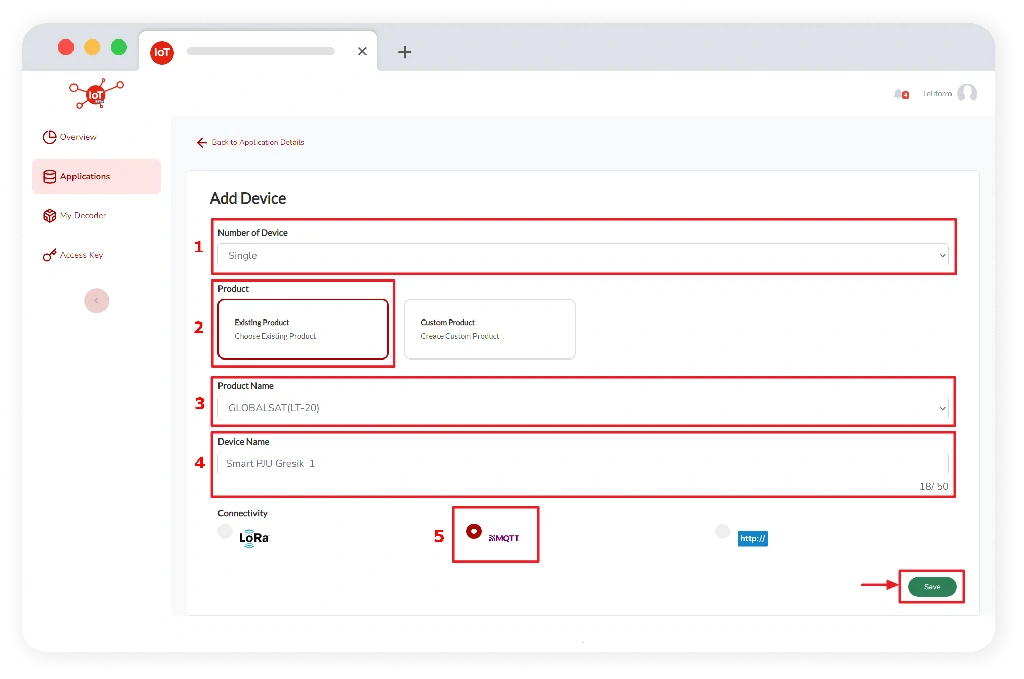
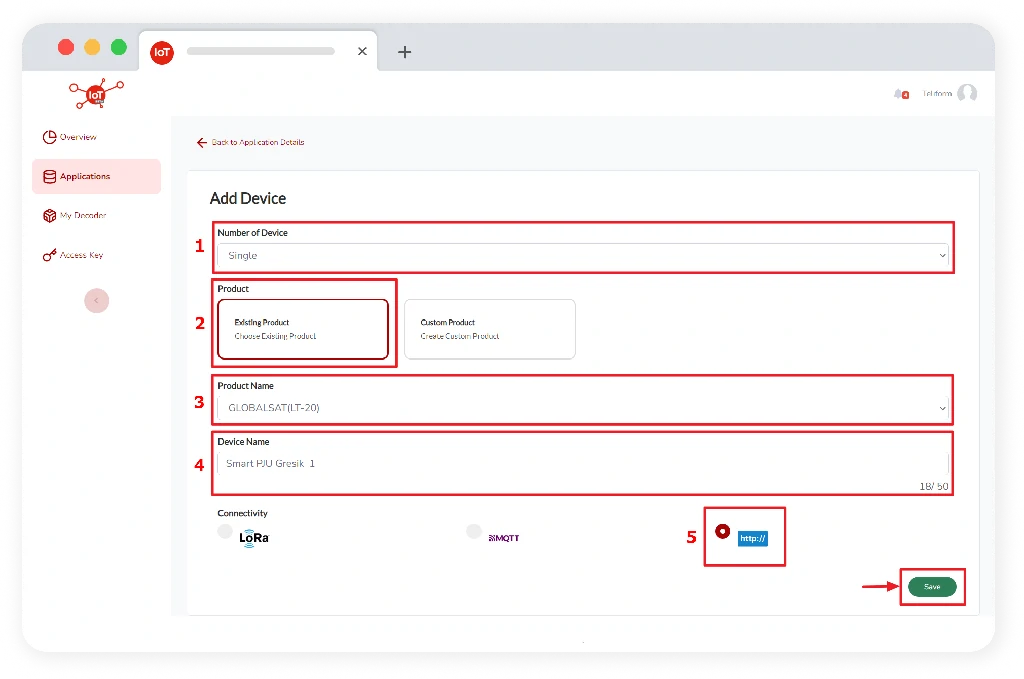
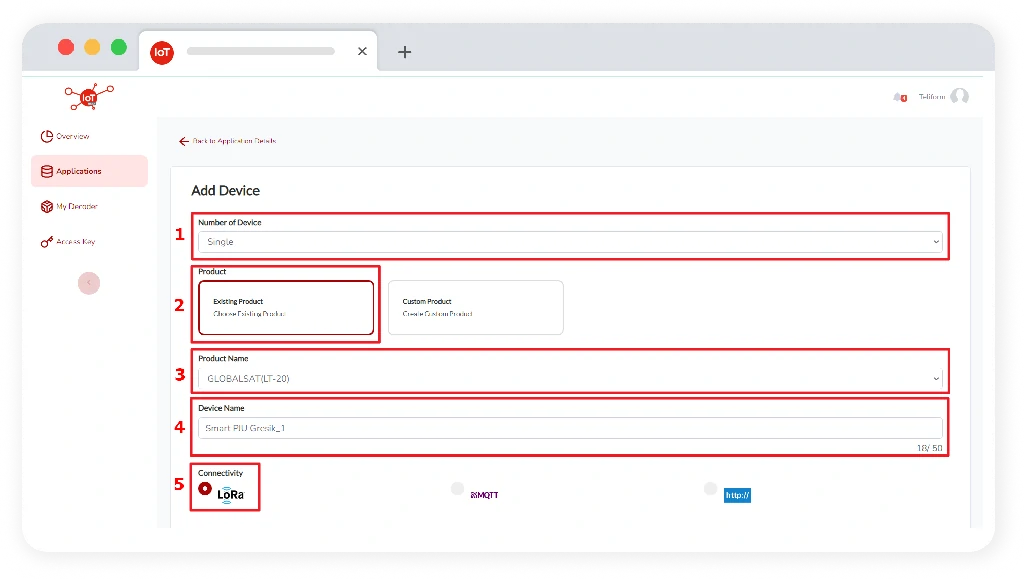
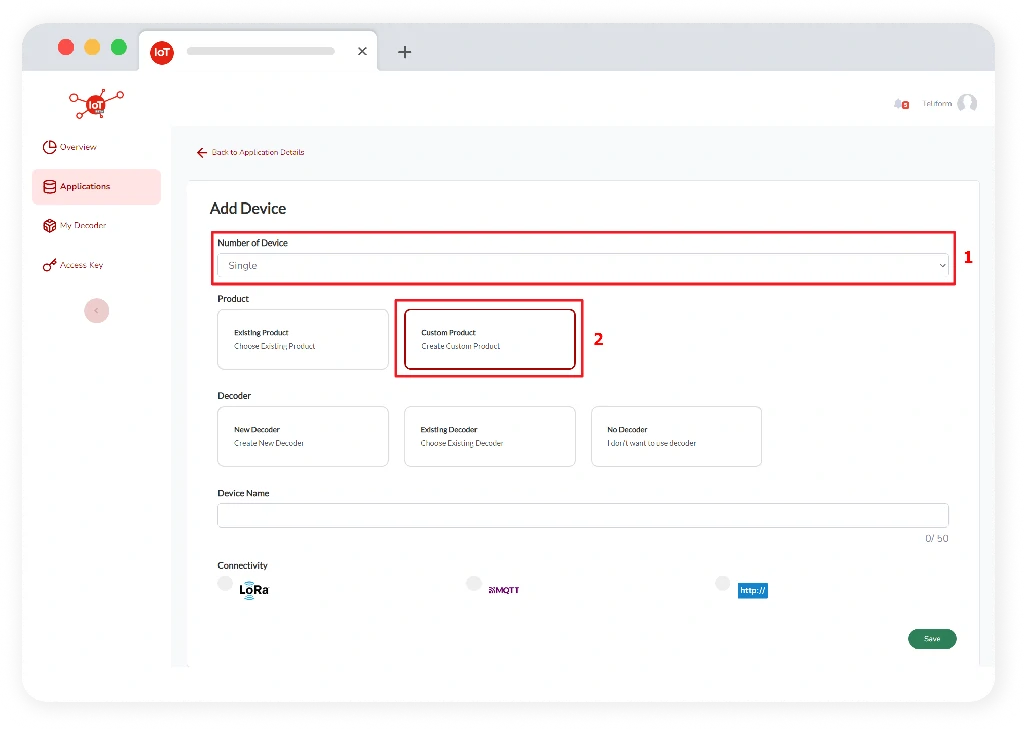
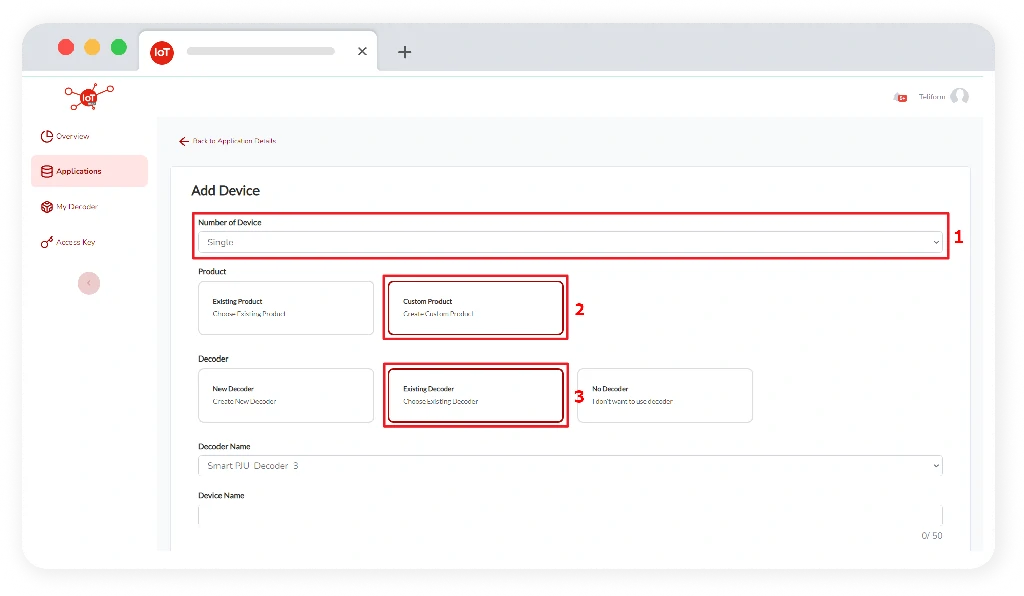
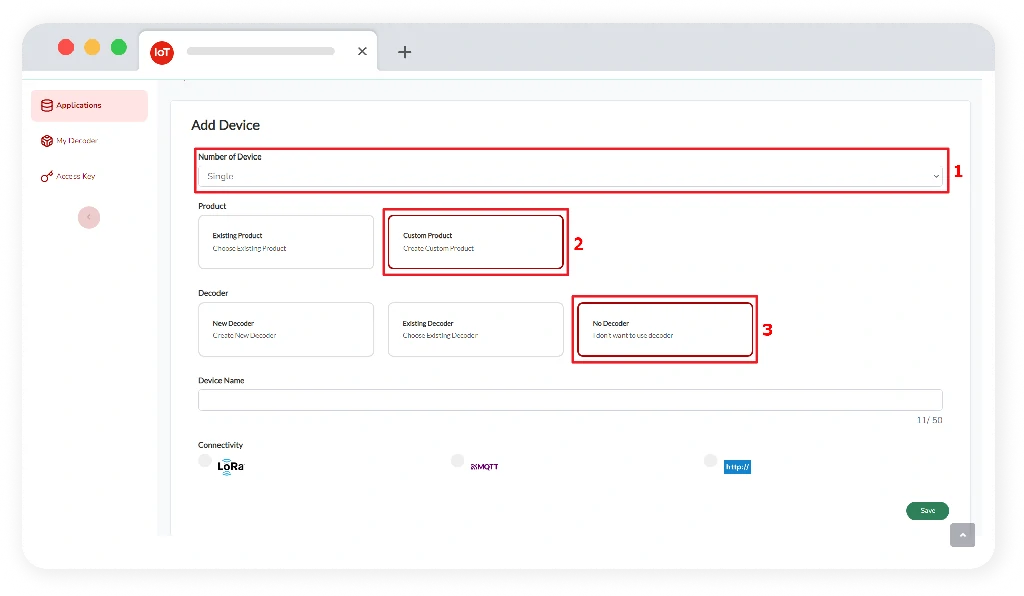
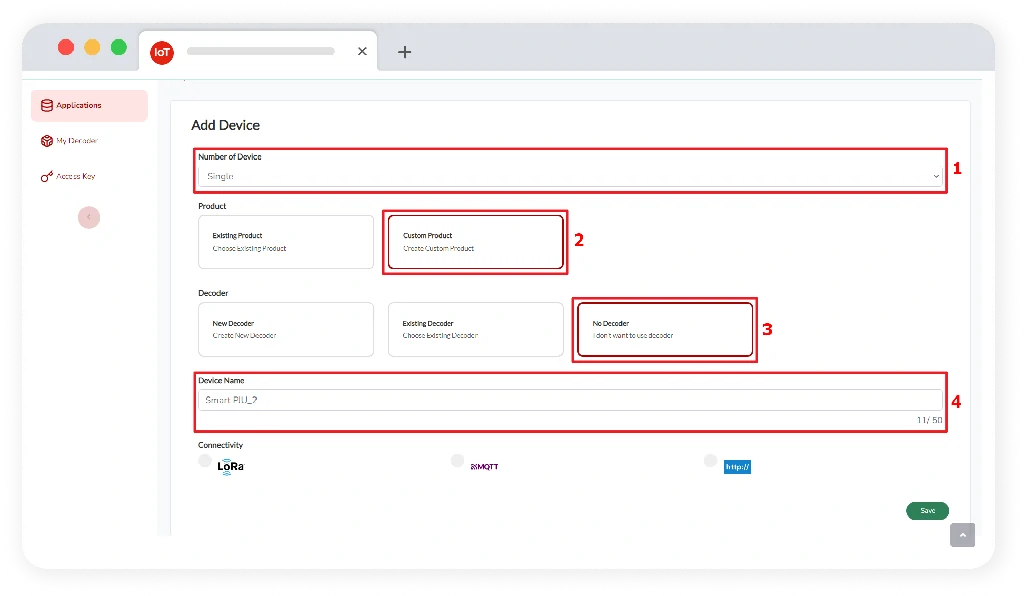
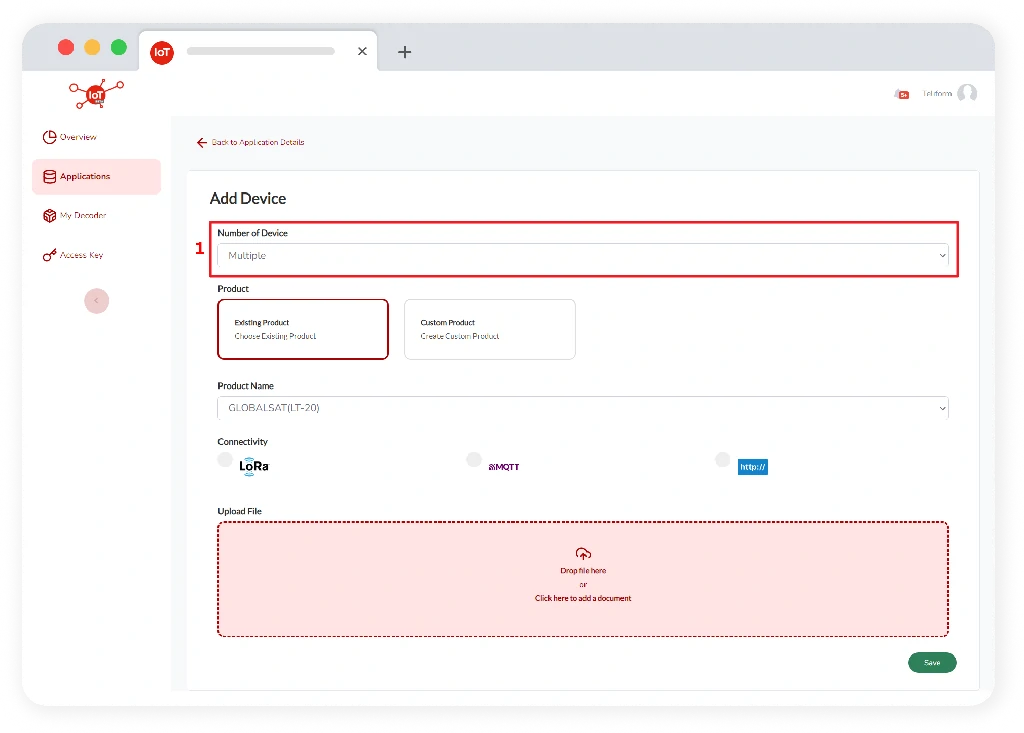
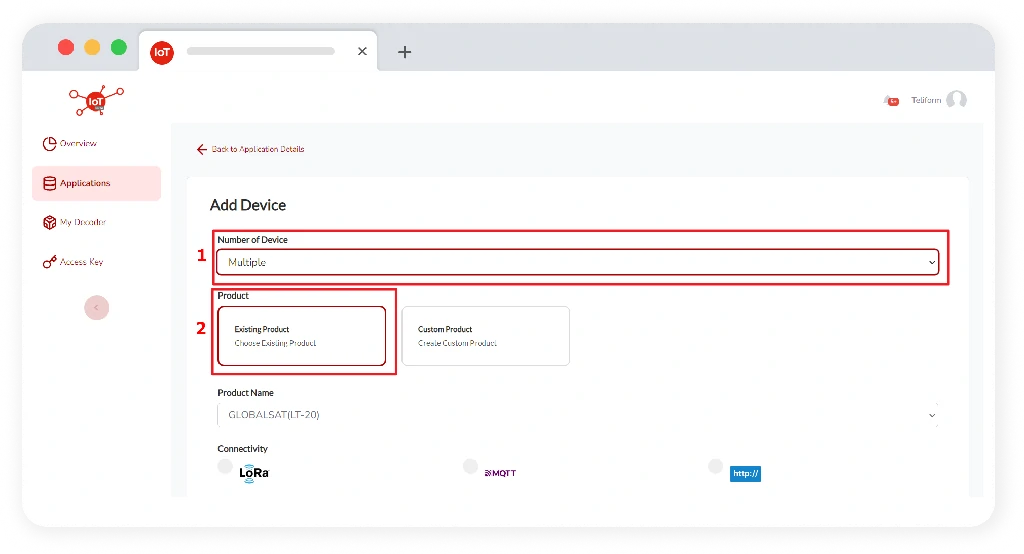
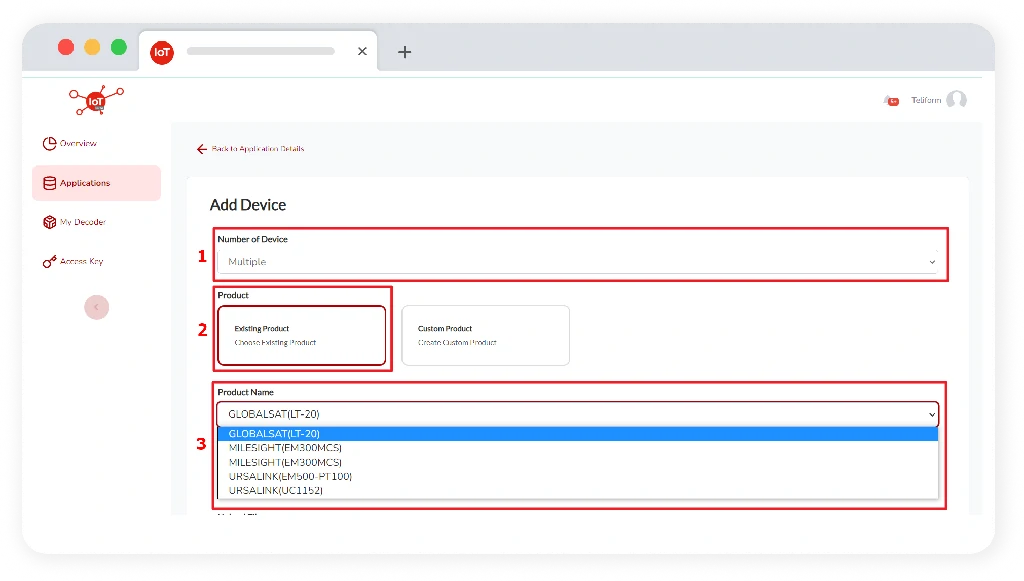
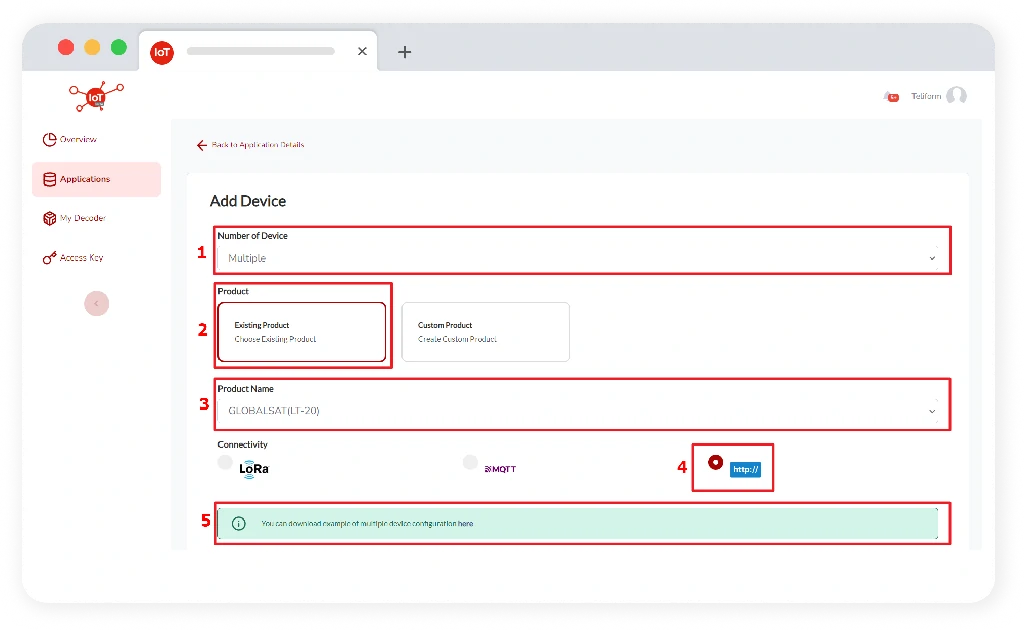
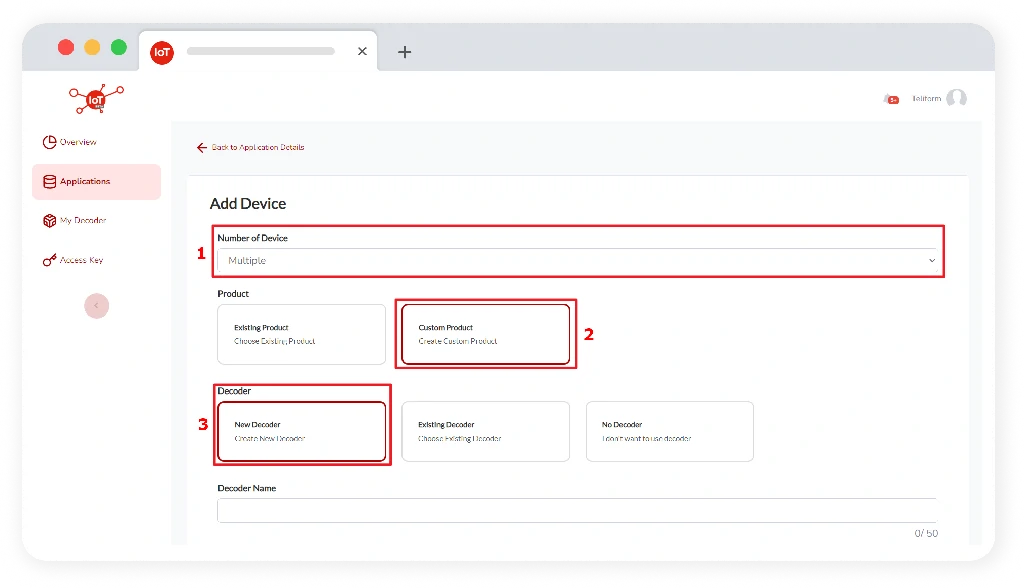
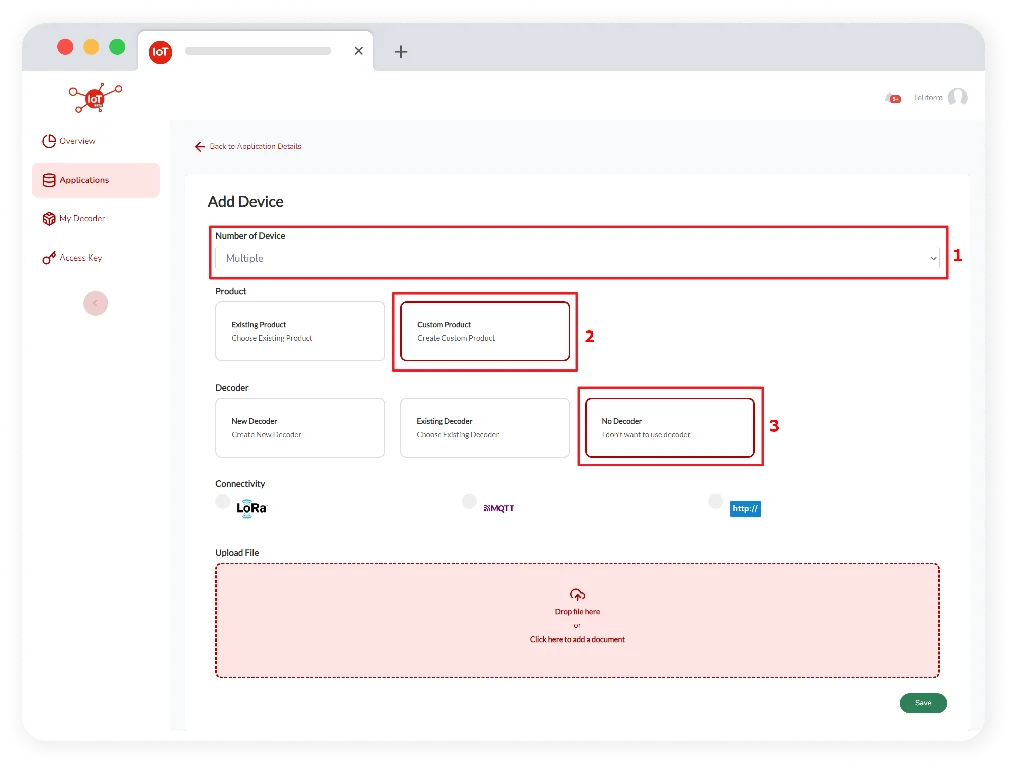
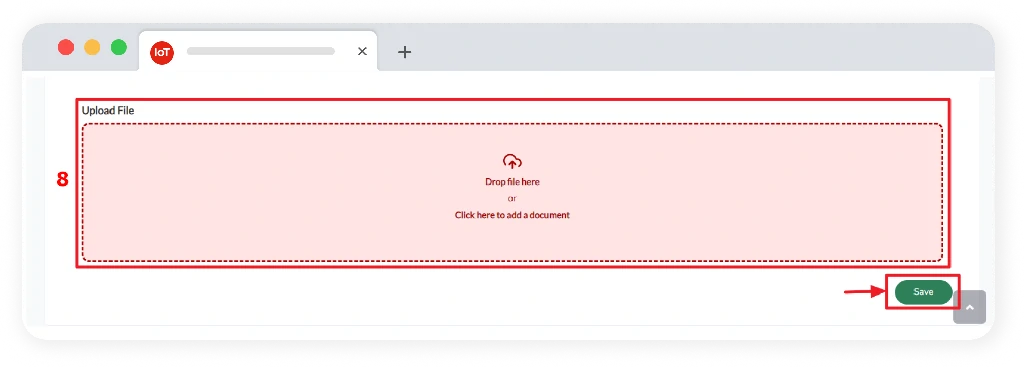
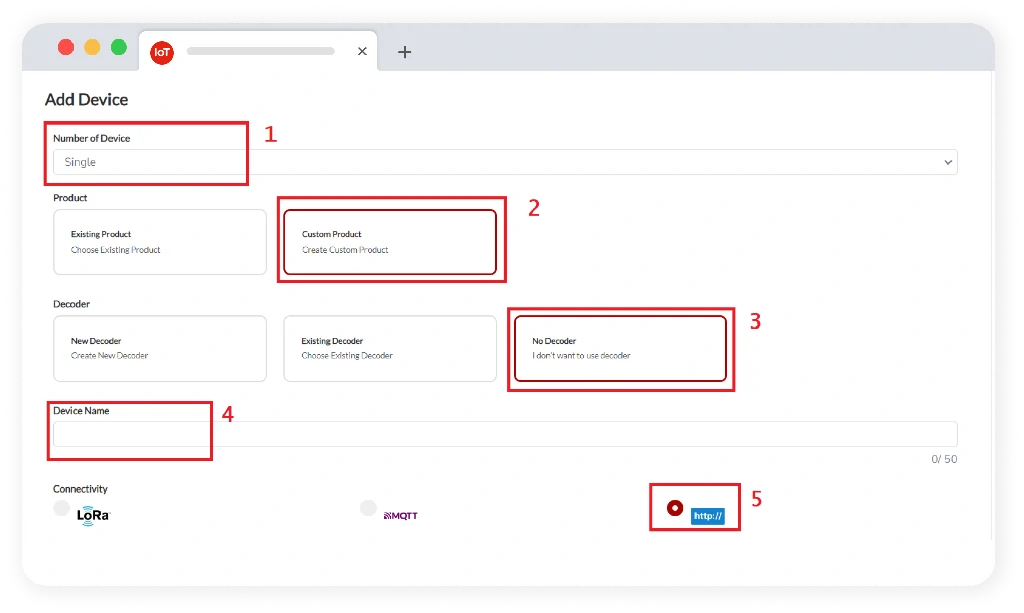
The device is a liaison between the external system and the data on the Telkom IoT Platform account. After the user has successfully created an application on the Telkom IoT Platform, the user can add a device to the application details. When the user wants to create a device, there will be many options in it, such as: number of device, product device, decoder & connectivity.
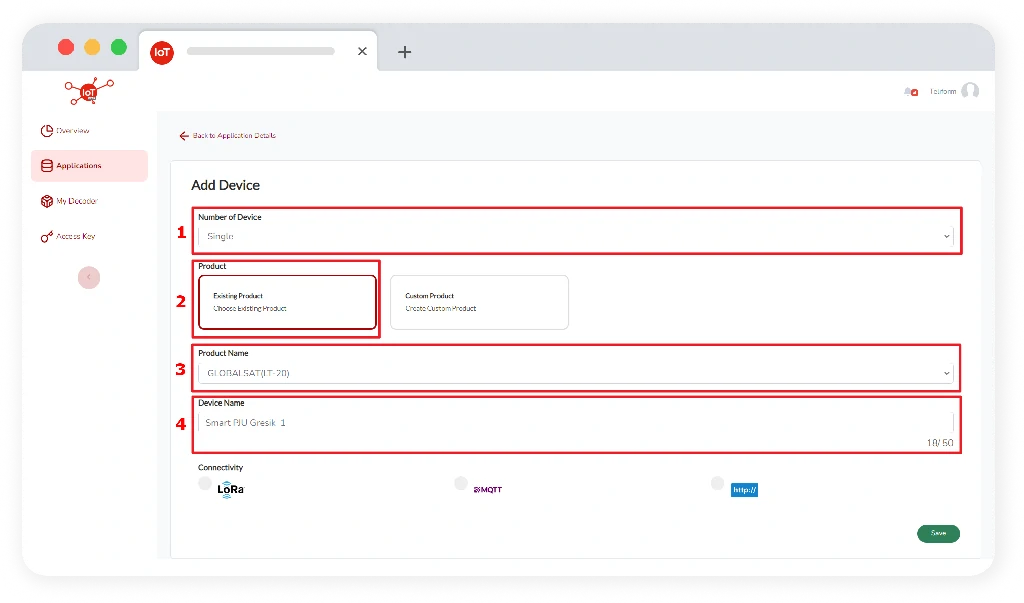
In device creation, user who has successfully created an application will be asked to fill in several fields required by the system, including the following:
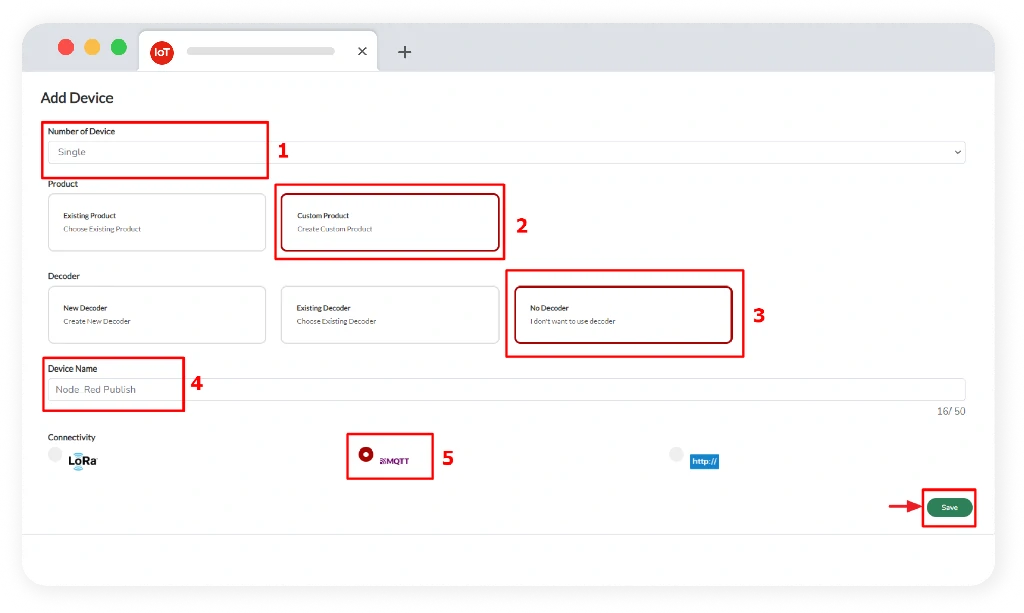
Number of Devices, is a type that will determine the number of devices and has two options including single and multiple devices. There are numbers of devices including Single and Multiple Devices.
On Single Device, the user can only enter a field that allows the user to add only one device.

Product, is the type of device that will determine the product to be made, including existing product and custom product:
Existing Product, is a type of product that has a decoder that has been recognized by the system/has been created by previous users.
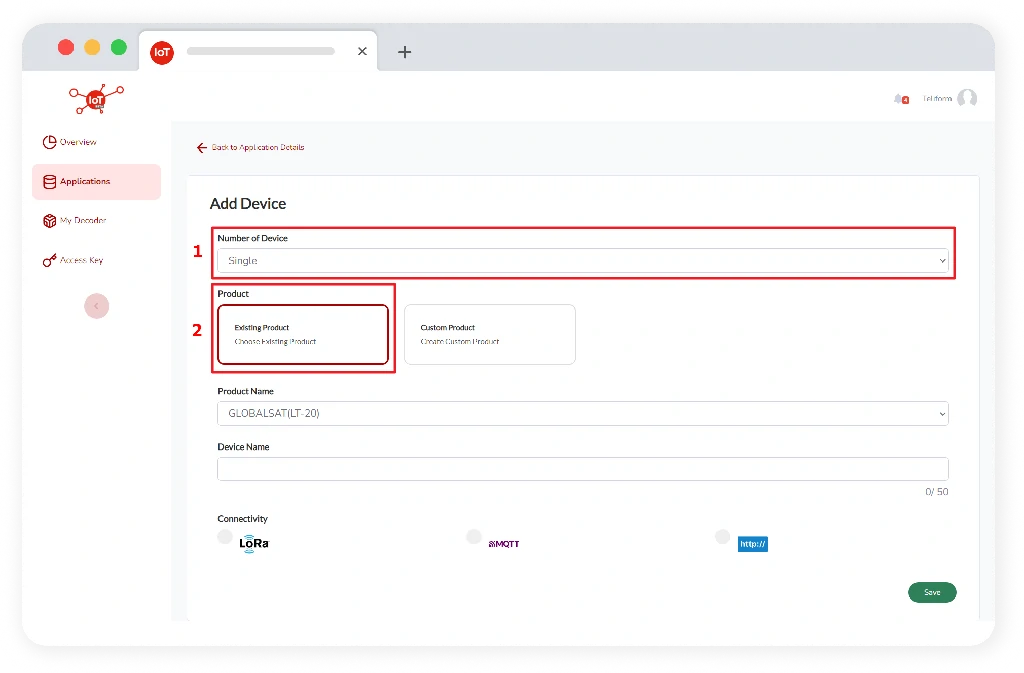
Product name is a selection of products that have been provided by the system to make it easier for users to choose which products are available.

Device name, is the name of the device which will be used and specified by the user.
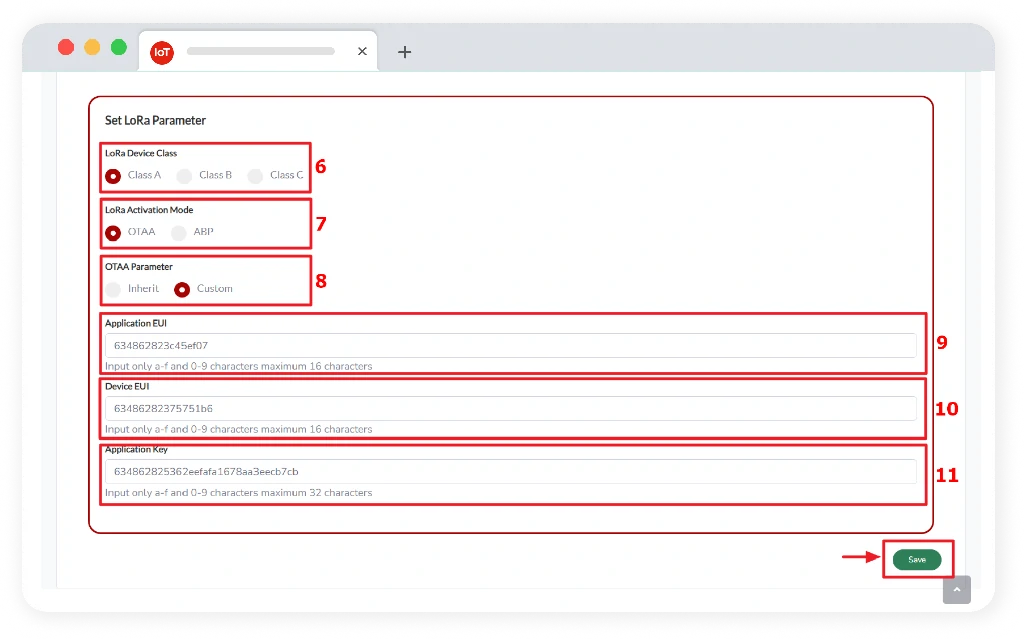
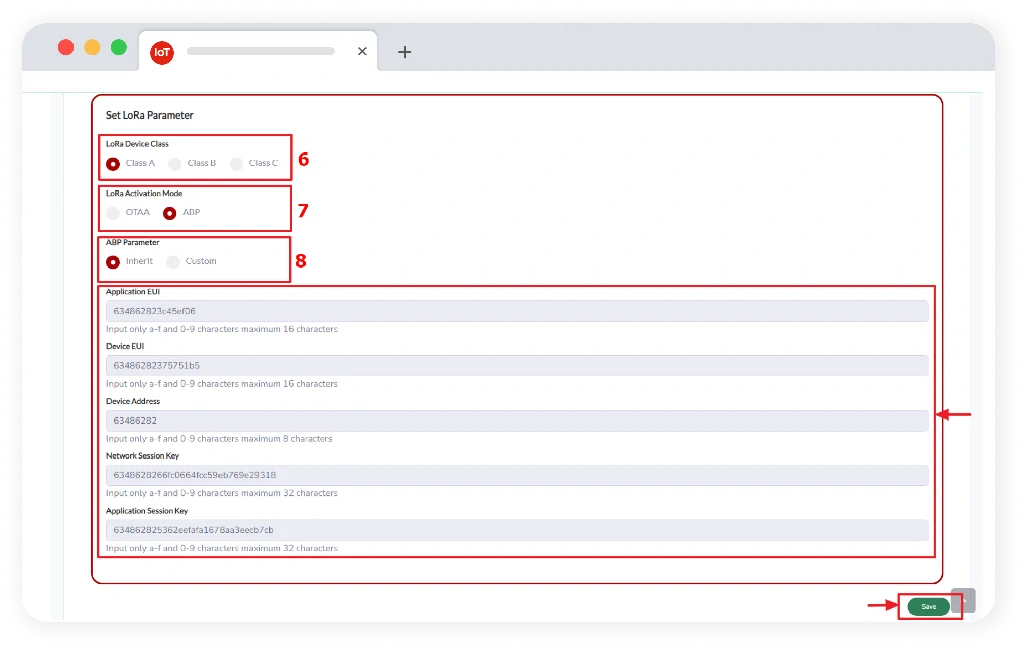
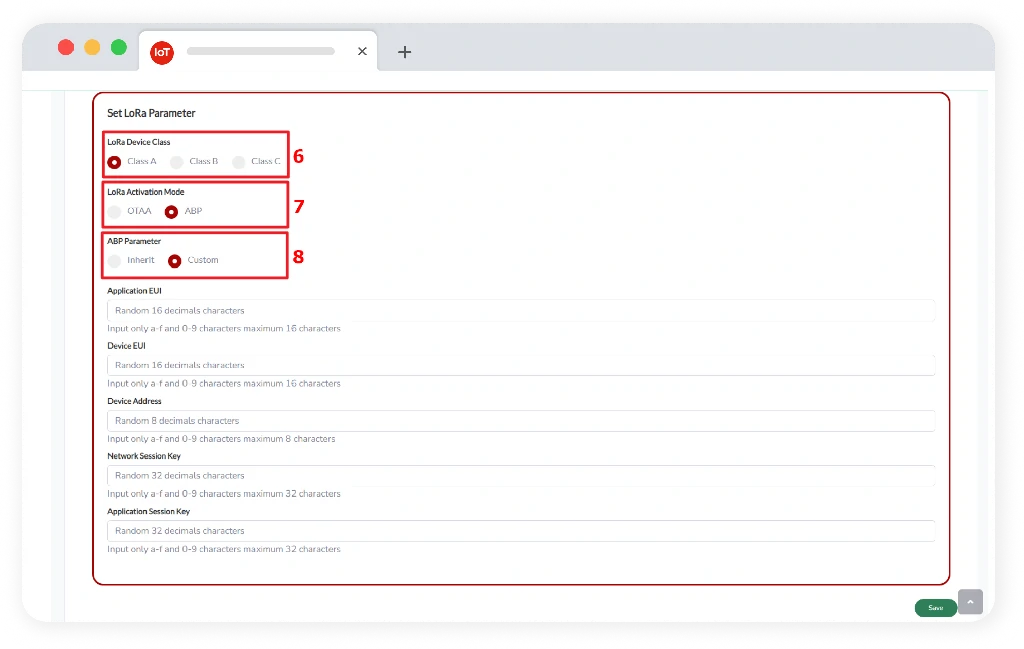
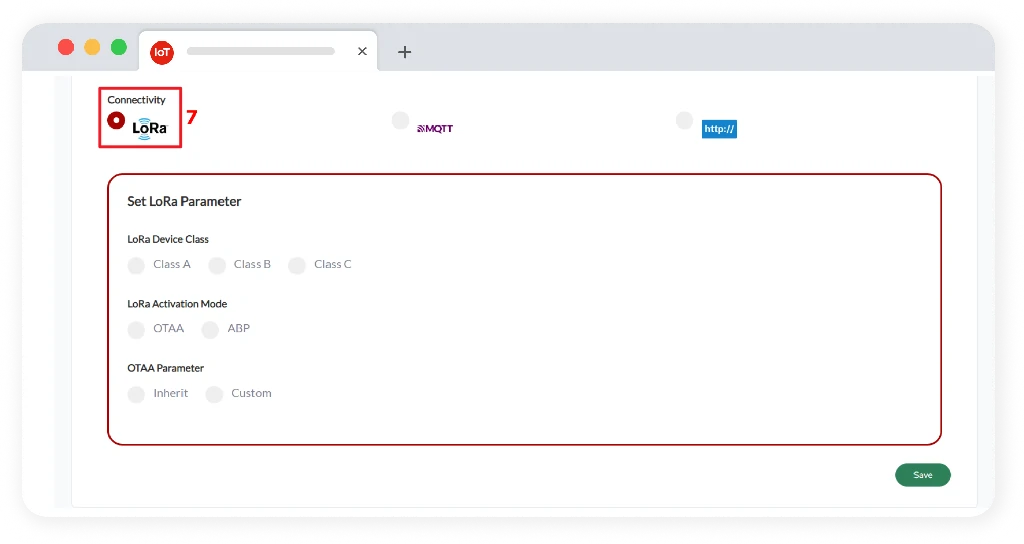
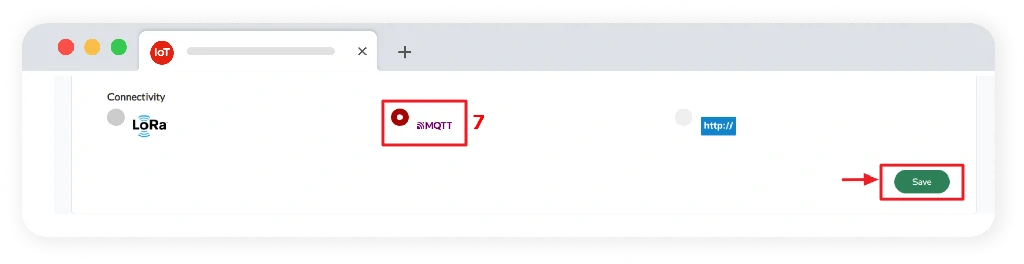
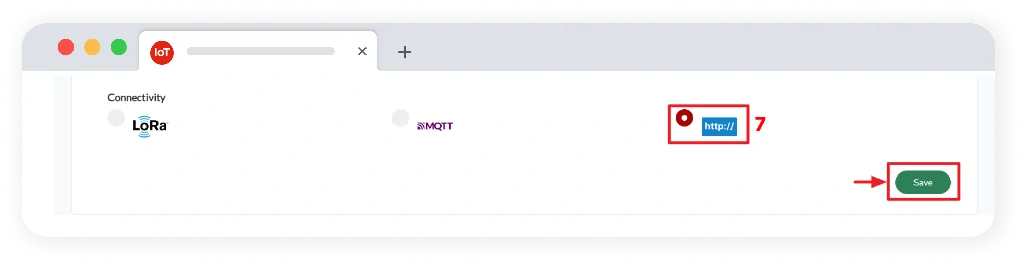
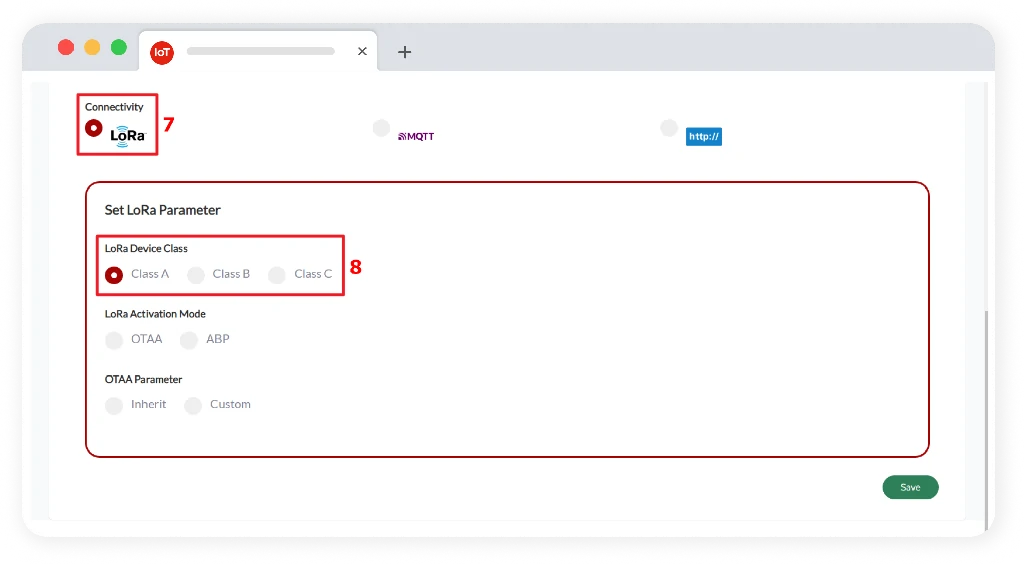
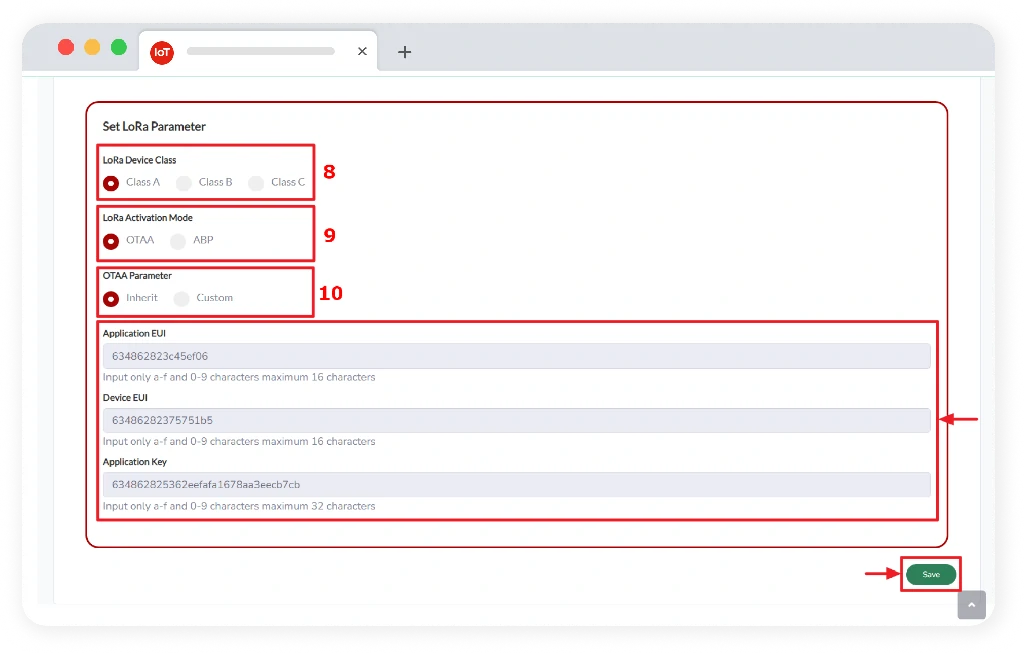
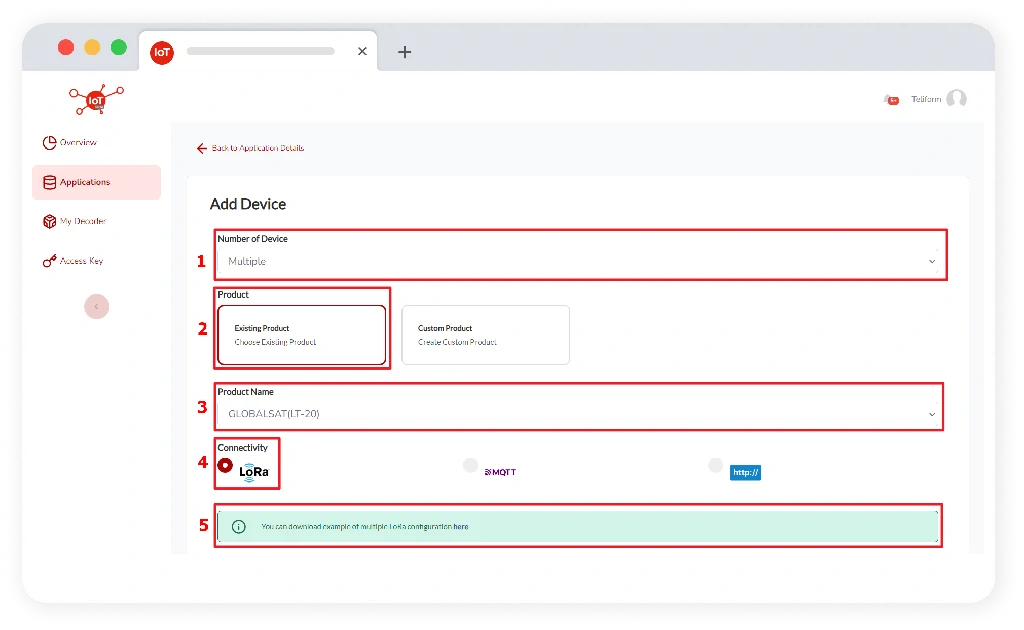
Connectivity, the type of connectivity will be used for a device. User can choose the type of connectivity such as LoRa, MQTT, and HTTP. If user’s device use the LoRa connectivity parameter, the configuration is as follows:
LoRa (Long Range) is a low-power long range wireless radio frequency technology.

MQTT, if your device uses MQTT, user can select MQTT connectivity then click the Save button. MQTT is a communication protocol that requires small resources and bandwidth. MQTT uses a broker in charge of connecting publishers and subscribers.
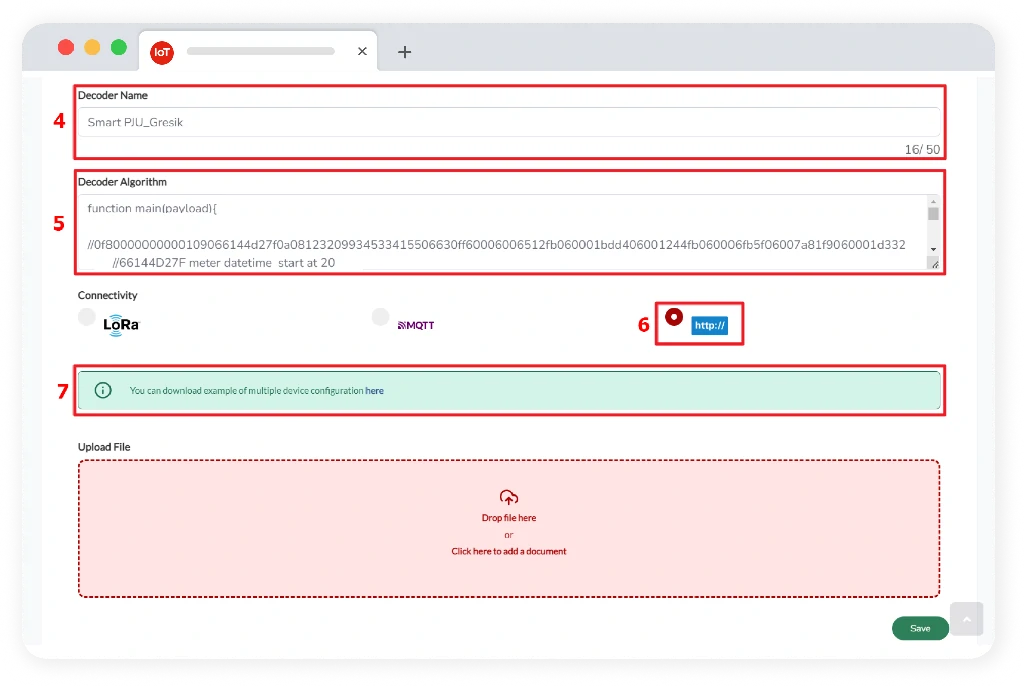
HTTP, if your device uses HTTP, user can select HTTP connectivity and then click the Save button. HTTP is an application layer network protocol that is used to assist the process of exchanging data on the internet between computers with one another.
The lora network consists of end devices and gateways and is divided into three classes with definitions as class A, class B, and class C which are two-way communication.
.webp)
.webp)
two-way communication with each device to send data, followed by two downlinks receiving short windows. Transition slots are scheduled by device and have the lowest power consumption.
two-way communication with scheduled slots receive, class B opens more receive windows. Thus allowing the device to synchronize the time from the gateway and notify the server when the device is operating.
two-way communication devices receive a maximum slot and almost have a slot receive window that opens and closes continuously when transmitting data, thus consuming more power, so it has the advantage of being able to communicate in real time.
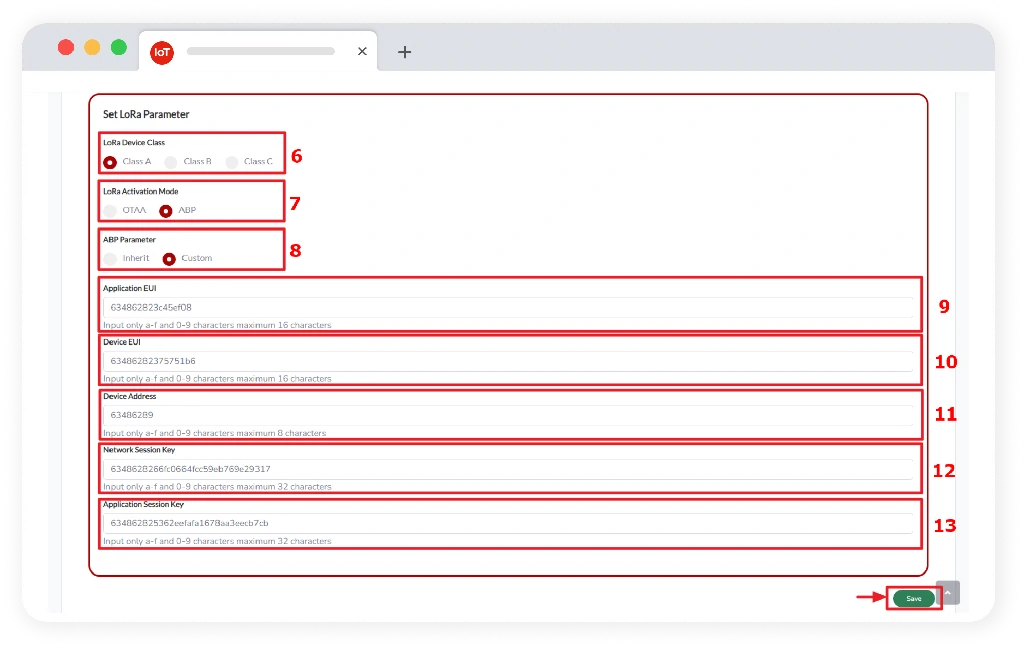
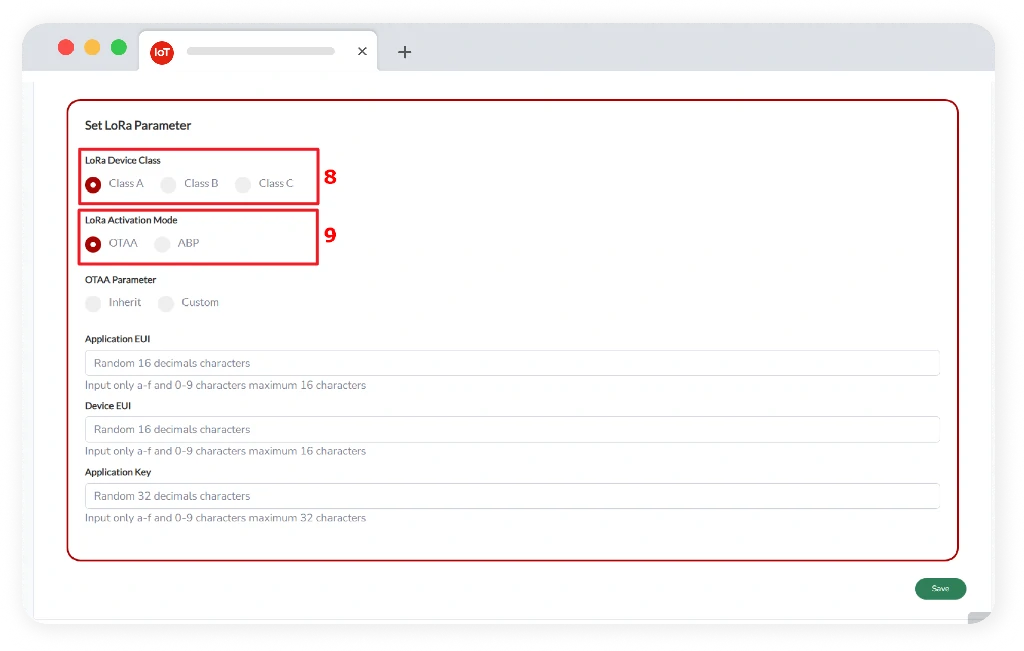
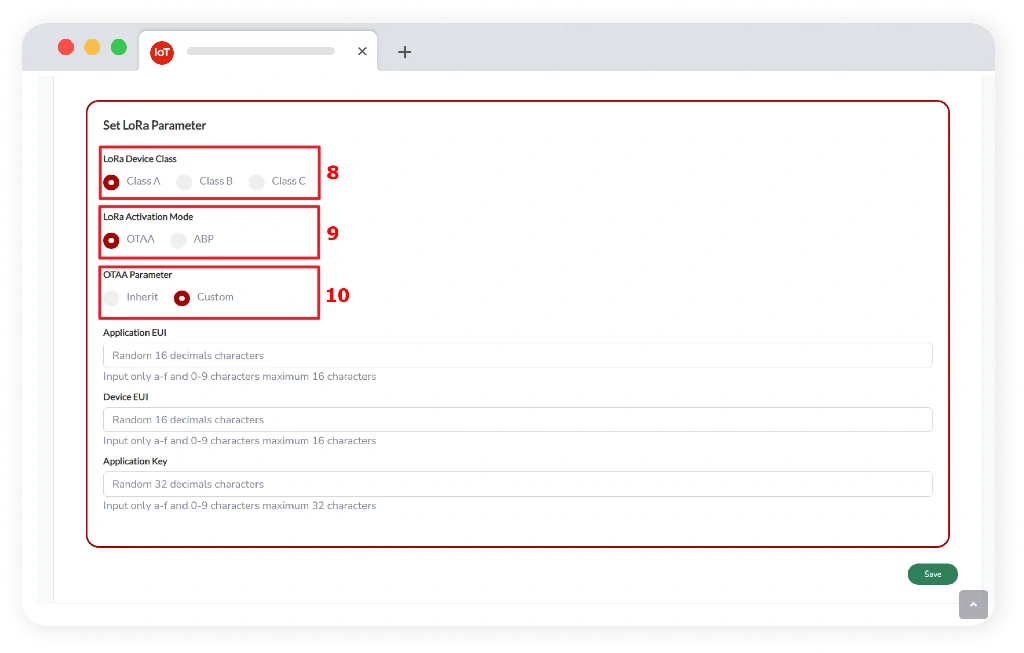
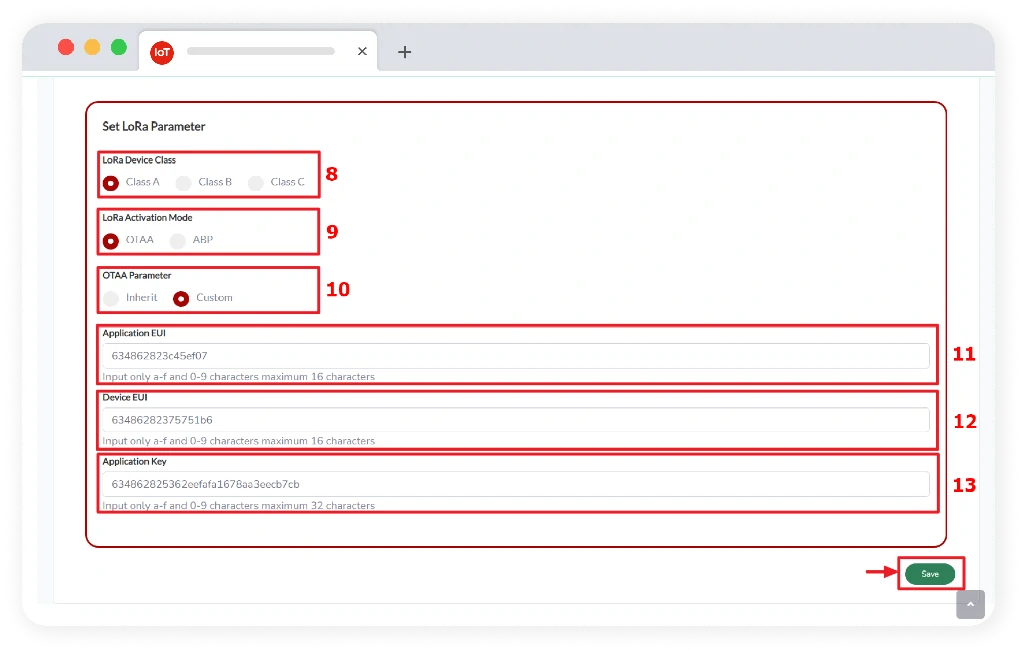
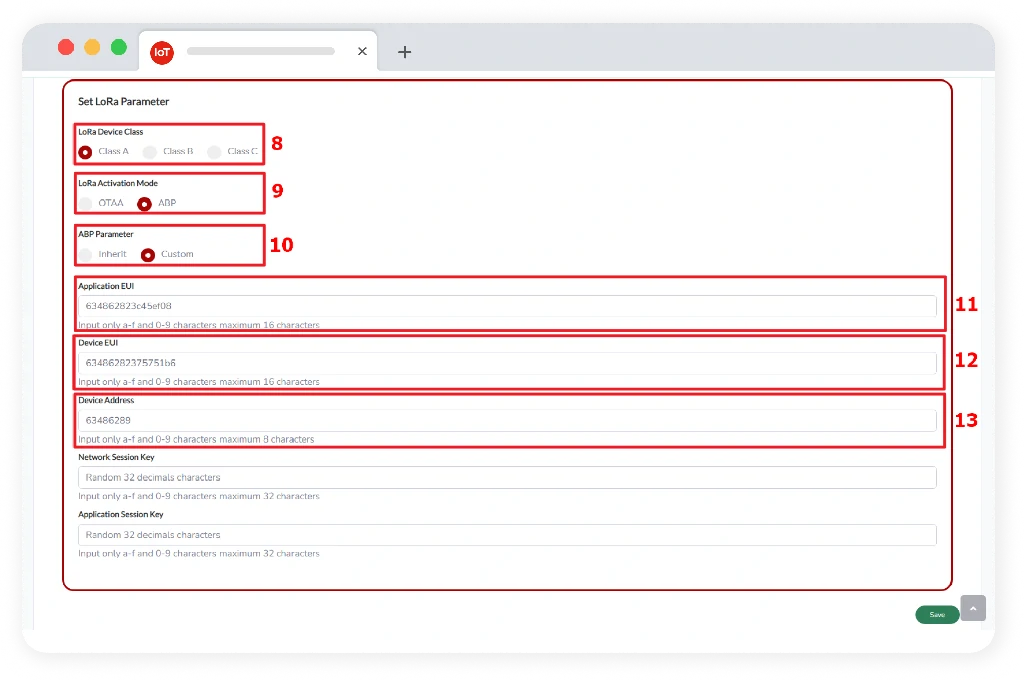
LoRa Activation Mode, the type of LoRa Activation Mode that will be used for a device. Users can choose the type of LoRa Activation Mode such as OTAA or ABP. If the user's device uses the LoRa Activation Mode parameter, the configuration is as follows:
.webp)
.webp)
Over-the-air activation, which involves direct communication between server and end device.
Involving new end devices which were added without existing keys, such as AppEUI, devEUI, etc.
There are 2 options in it, including the following:
make sure the data generated by the system and input into the end device.
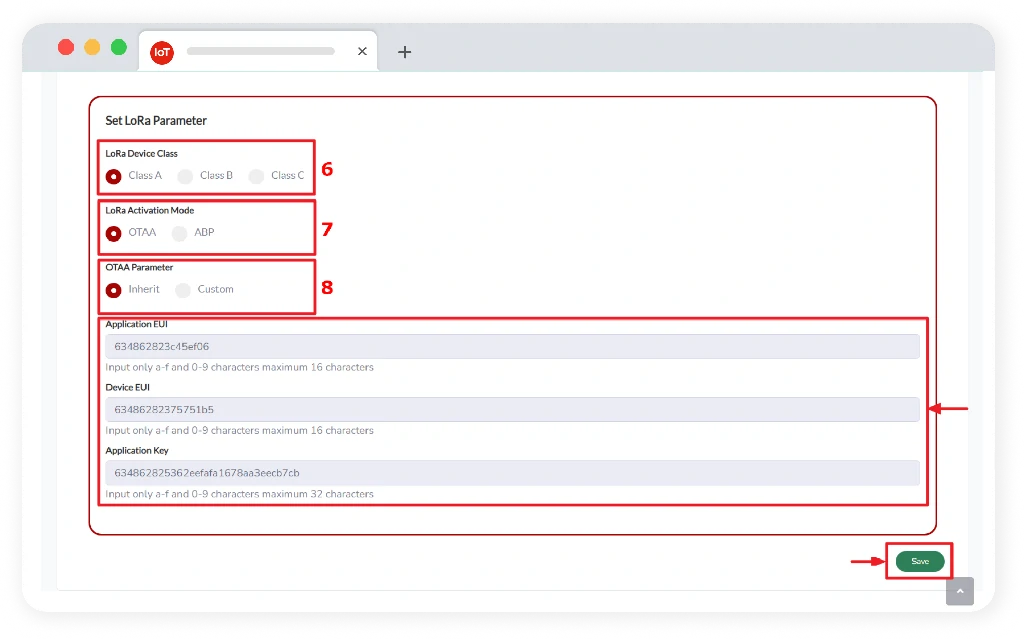
Input end device parameters into the system.
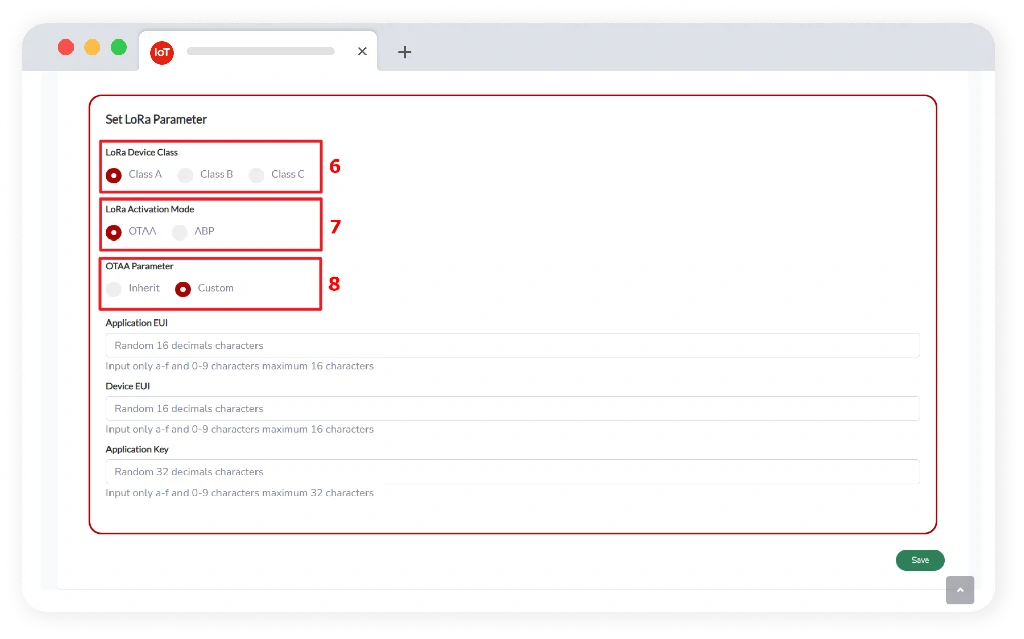
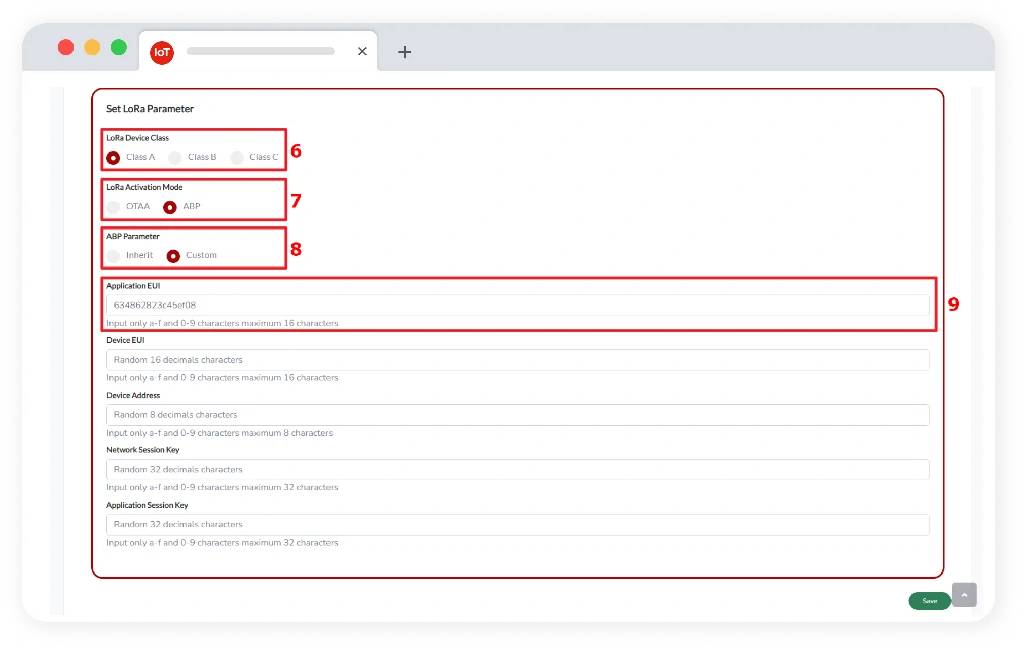
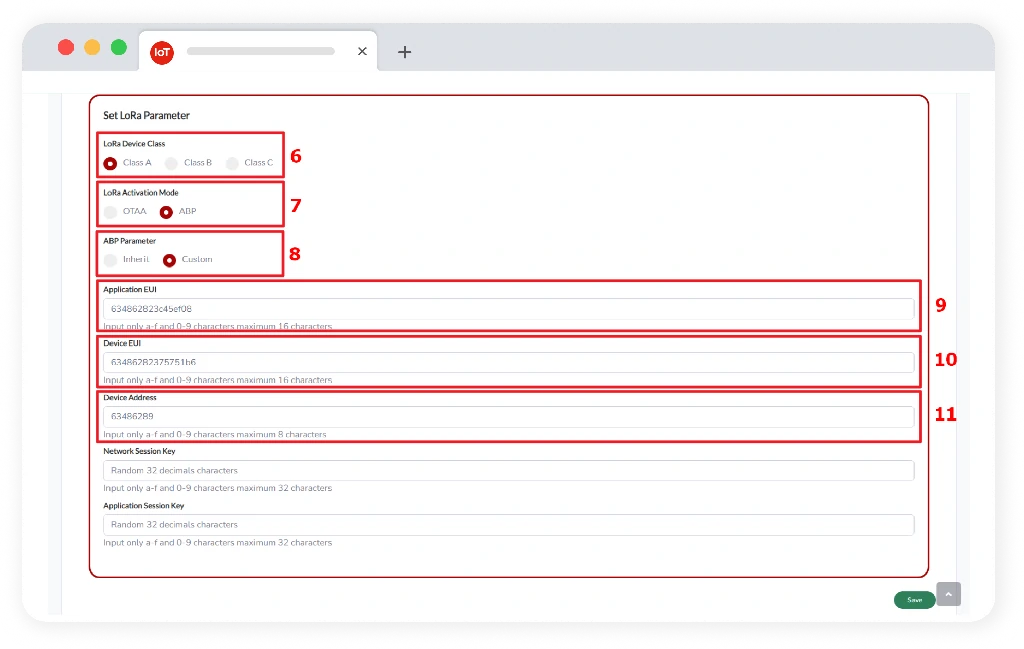
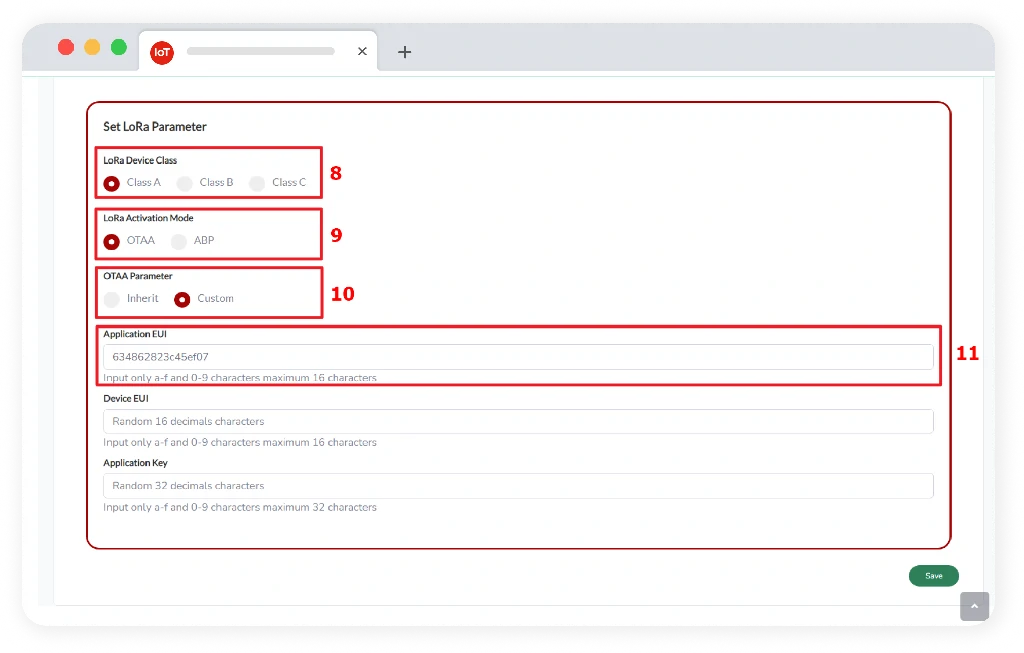
Application EUI is a unique ID of the application server, obtained from the IEEE EUI64 standard that identifies the entity to connect to the network, Application EUI is stored on the end-device. Each application server will have a unique Application EUI ID. Application EUI can be generated by the Telkom IoT Platform, commonly called inherit or can also use the manual method, namely custom.
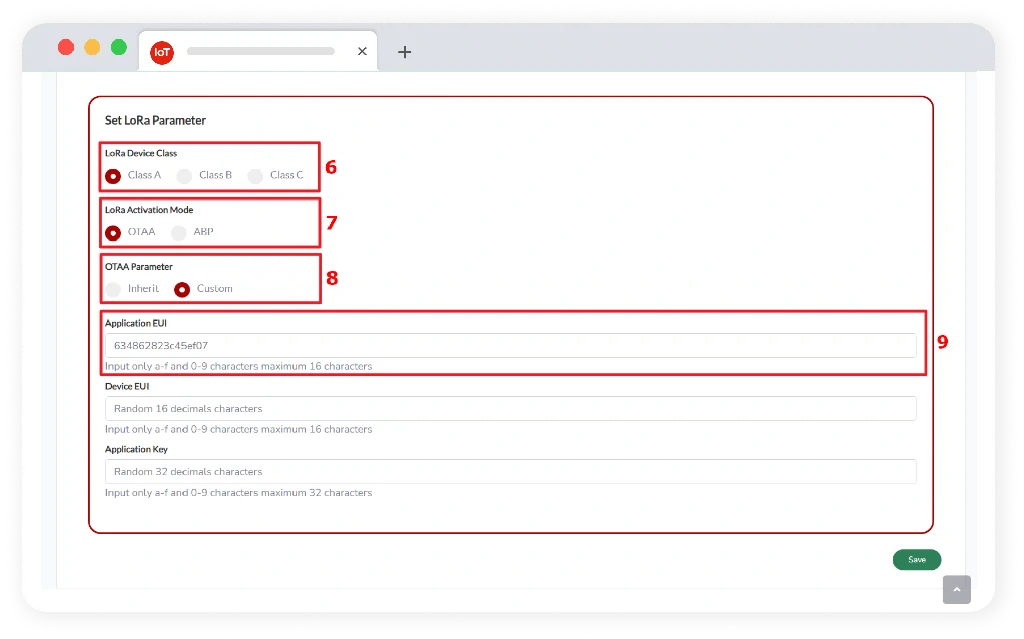
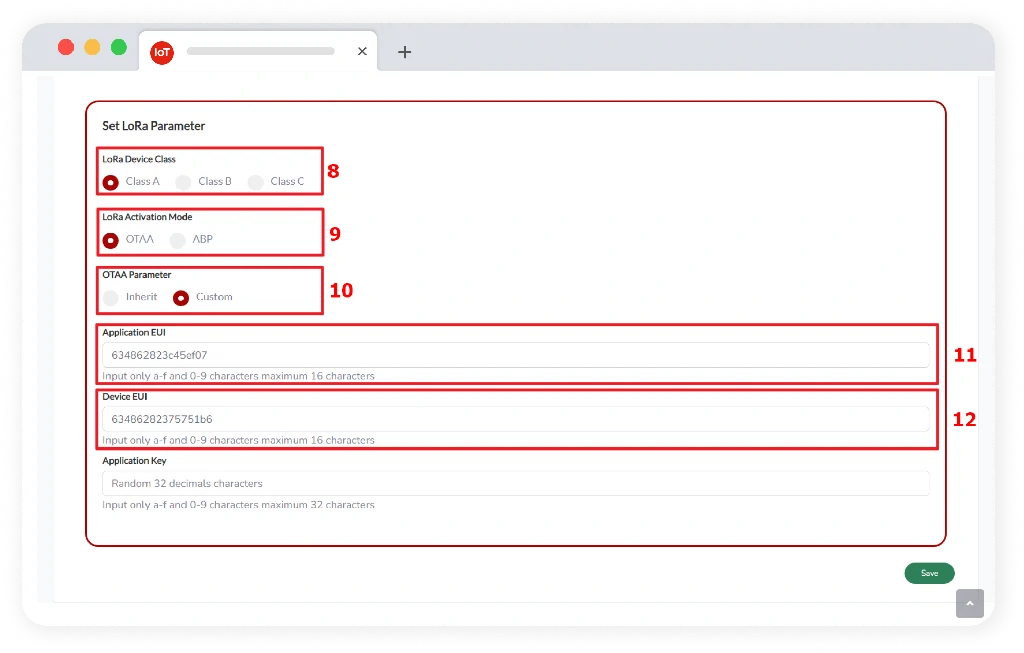
Device EUI is like a Mac Address, or a unique code of the end device that follows the Lora alliance standard and is used to identify the device.
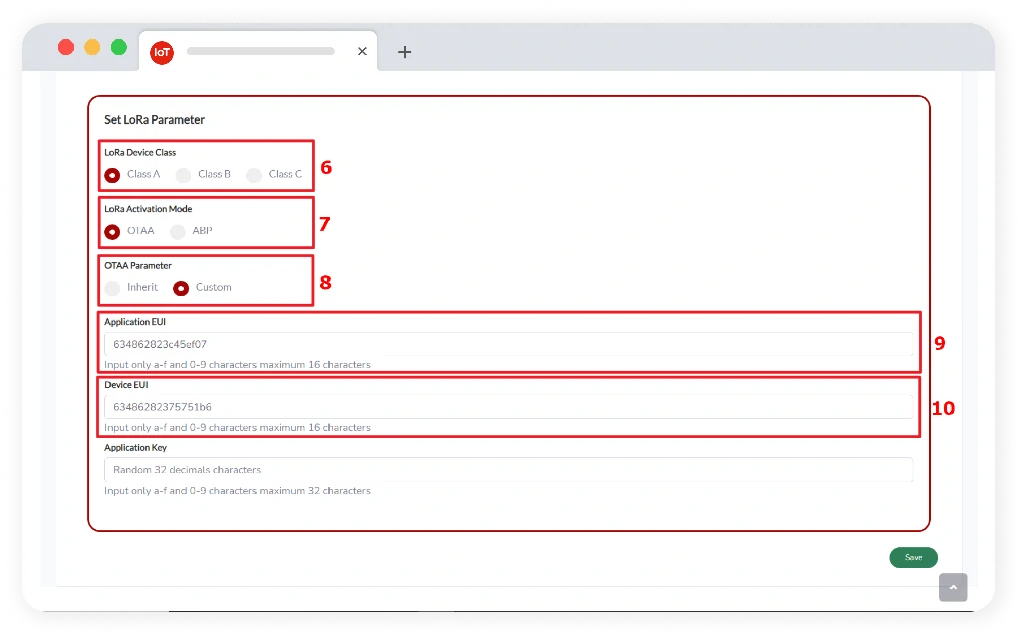
The Application Key is the encryption key between the message source behind the Device EUI and the message destination behind the Application EUI. Each key must be unique for each device.
There are 2 options in it, including the following:
make sure the data generated by the system and input into the end device.
Input end device parameters into the system.
Application EUI is a unique ID of the application server, obtained from the IEEE EUI64 standard that identifies the entity to connect to the network, Application EUI is stored on the end-device. Each application server will have a unique Application EUI ID. Application EUI can be generated by the Telkom IoT Platform, commonly called inherit or can also use the manual method, namely custom.
Device EUI is like a Mac Address, or a unique code of the end device that follows the Lora alliance standard and is used to identify the device.

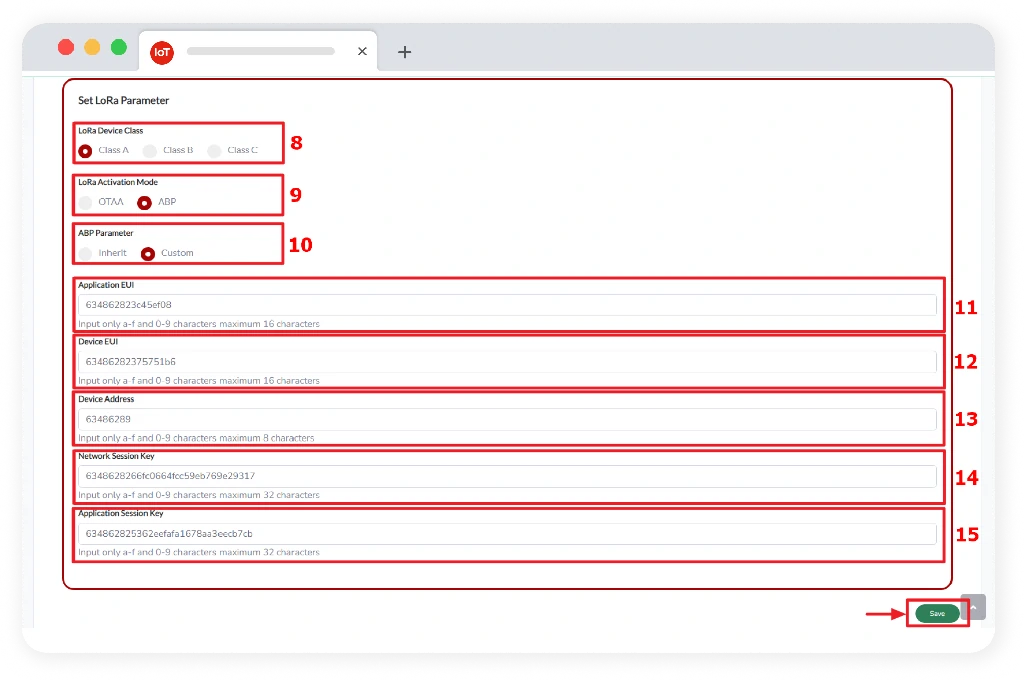
Device Address serves to identify the hardware as an identifier so that each particular device has a unique ID.
Network Session Key (NwkSKey) is used for interaction between Node and Network Server which is used to validate integrity on each message with integrity code on each message.

The Application Session Key (AppSKey) is used for encryption and decryption of the payload. Where, Payload is fully encrypted between the Node and the Handler/Application Server component of the Telkom IoT Platform, which means that only users can read the contents of messages that have been sent or received.
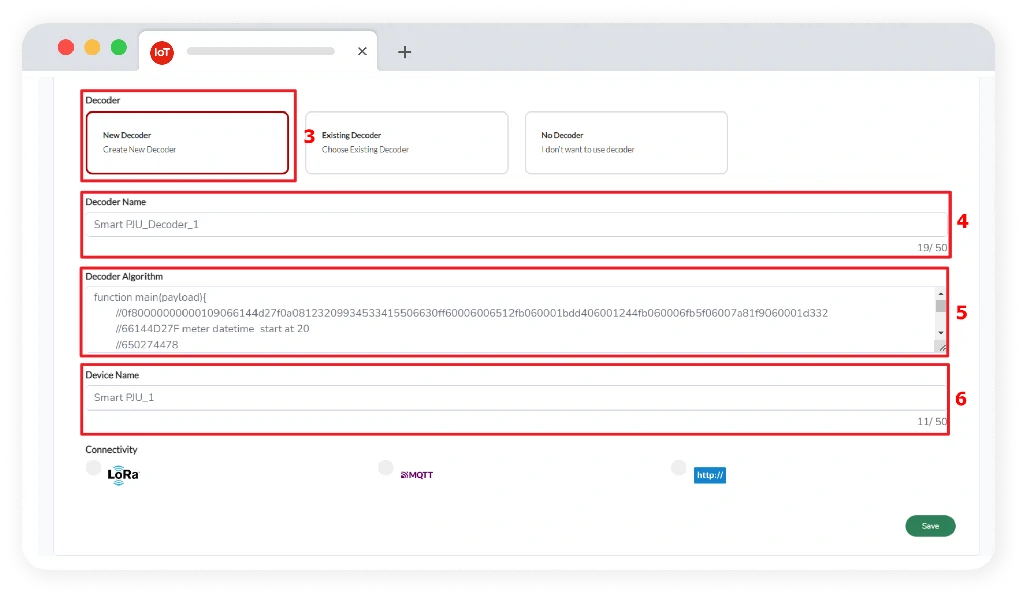
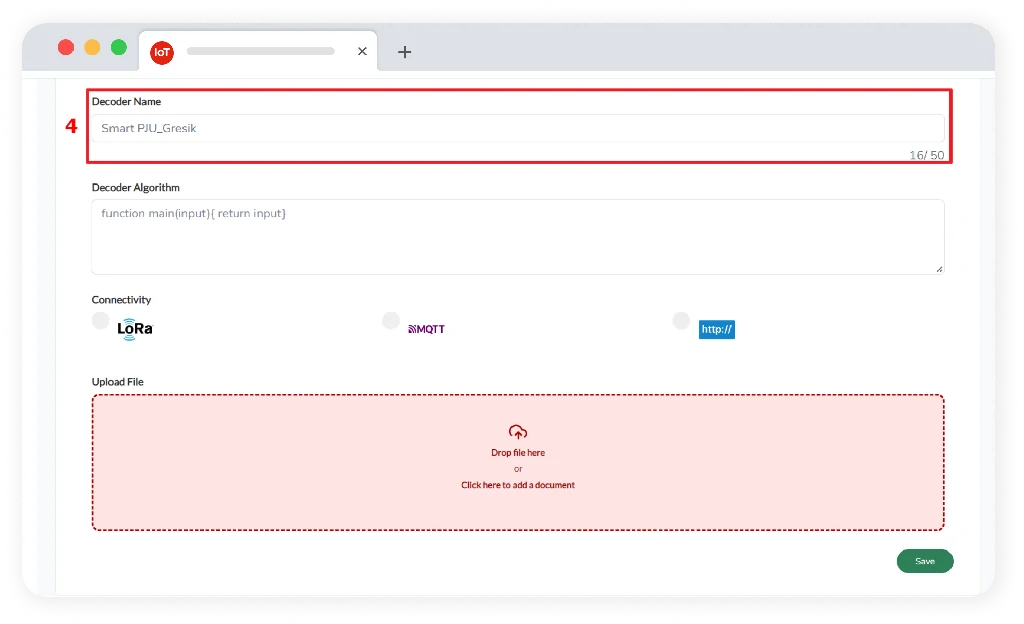
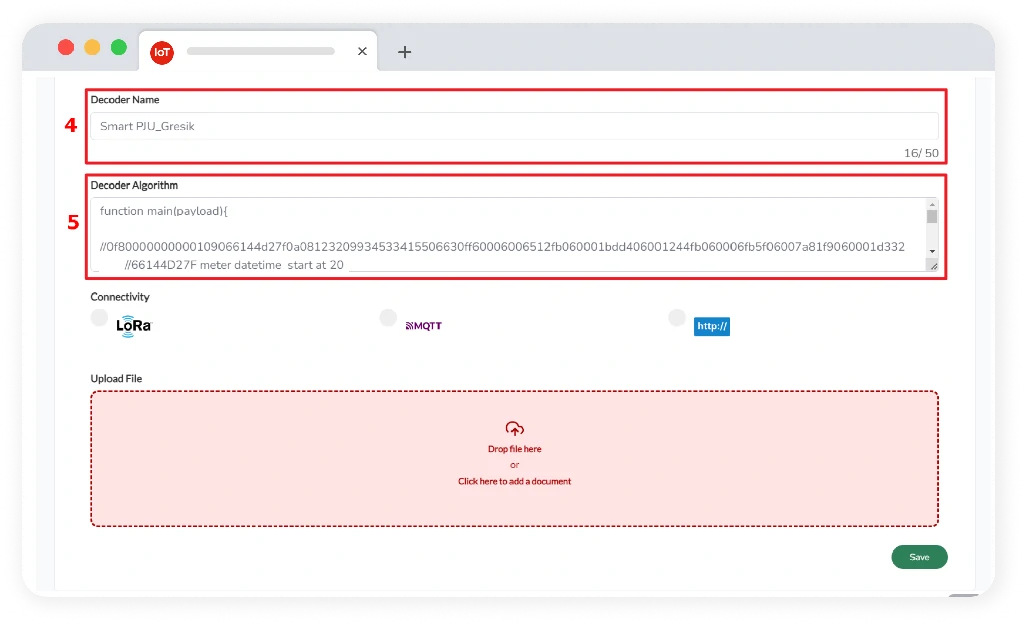
Custom Product, field that contains user’s settings who have their own devices in the form of decoder.
On the new decoder, the user can enter a new decoder that has never been created before. The following are additional data inputs that the user must enter:
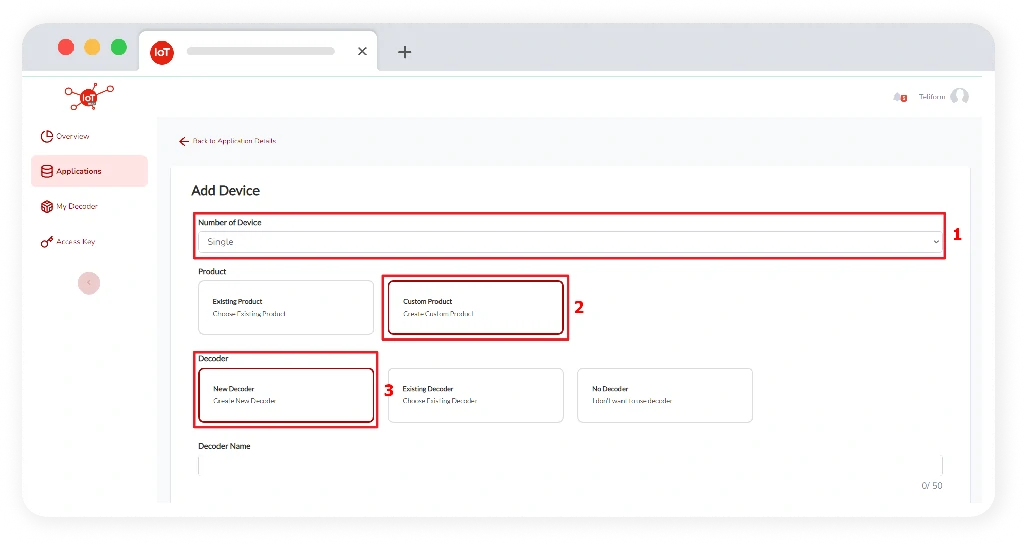
The name of the decoder, is the name of the decoder that will be used and is defined by the user.
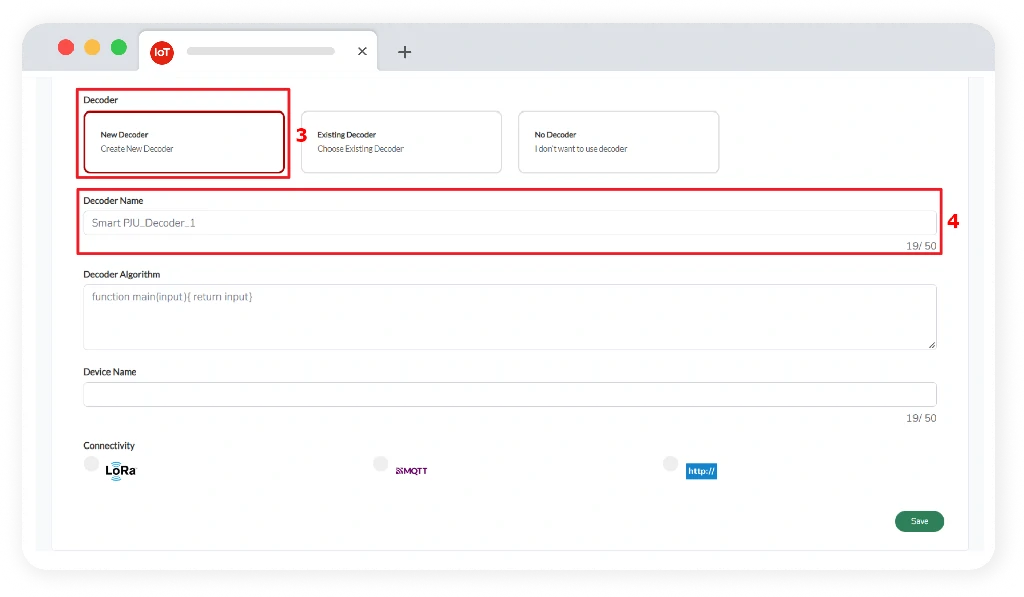
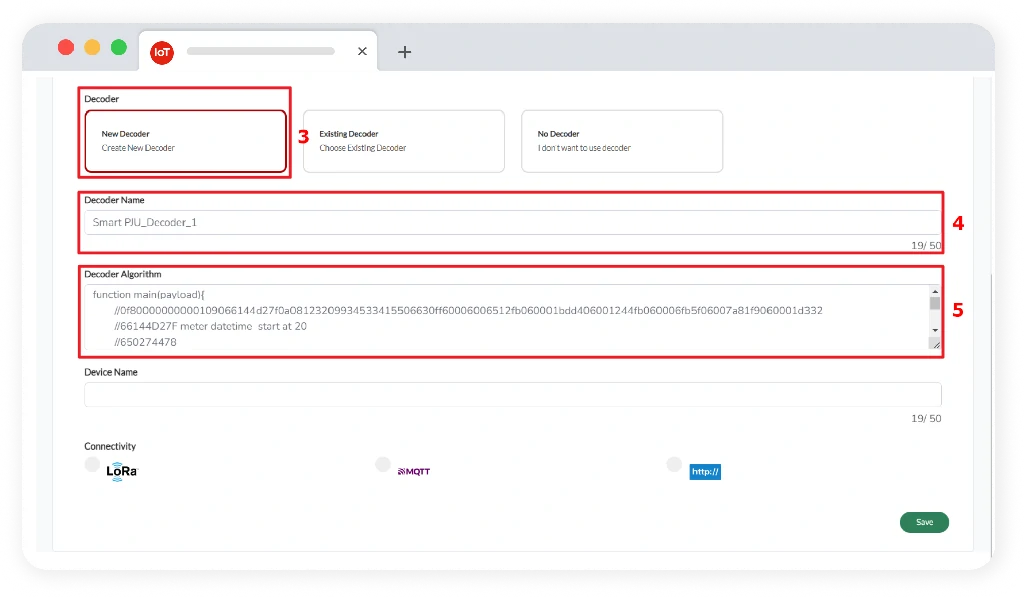
Device name, is the name of the device which will be used and specified by the user.
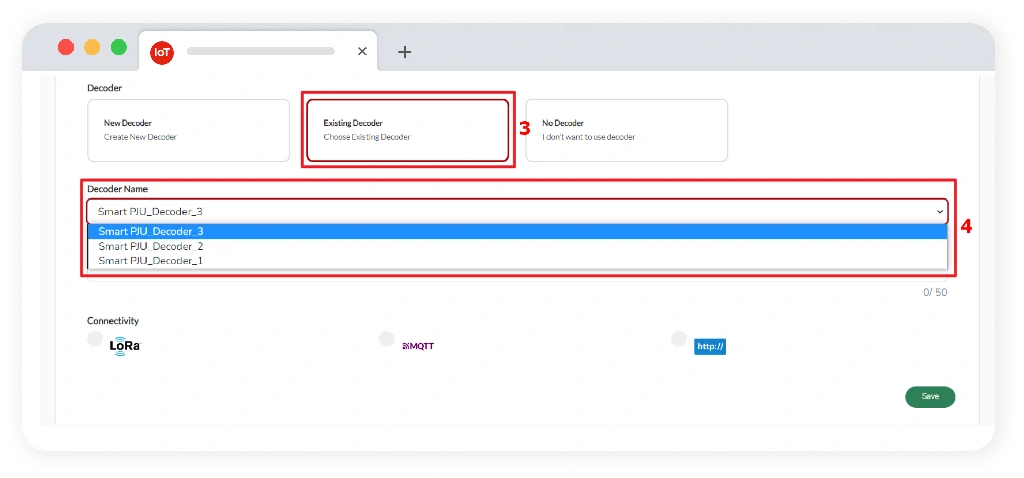
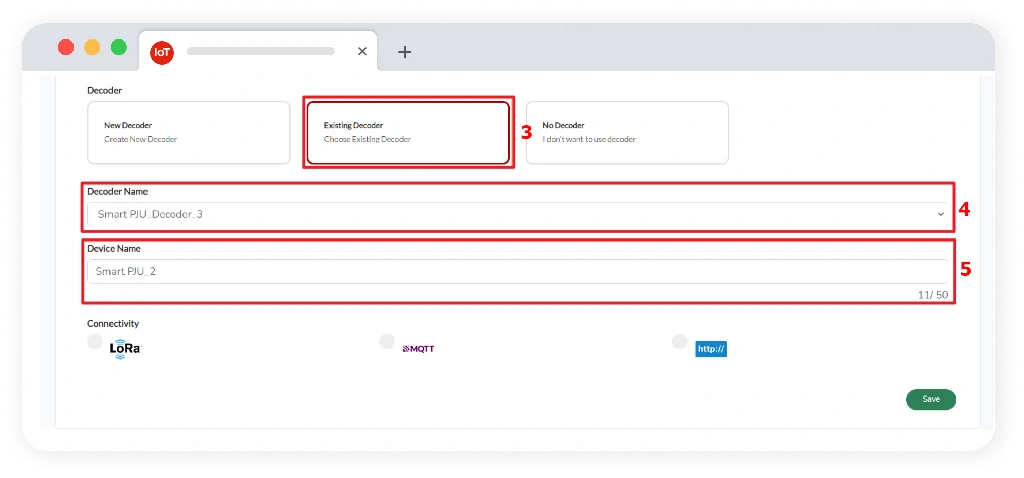
On the existing decoder, the user can choose a decoder that has been made previously on the existing decoder, the user can choose a decoder that has been made previously. Device name, is the name of the device which will be used and specified by the user. The following are additional data inputs that the user must enter:
The name of the decoder, is the name of the decoder that will be used and is defined by the user.
The name of the decoder, is the name of the decoder that will be used and is defined by the user.
On no decoder, user can create device but no decoder added. The following are additional data inputs that the user must enter:
Device name, is the name of the device which will be used and specified by the user.
Connectivity, the type of connectivity will be used for a device. User can choose the type of connectivity such as LoRa, MQTT, and HTTP. If user’s device use the LoRa connectivity parameter, the configuration is as follows:
LoRa (Long Range) is a low-power long range wireless radio frequency technology.
MQTT, if your device uses MQTT, user can select MQTT connectivity then click the Save button. MQTT is a communication protocol that requires small resources and bandwidth. MQTT uses a broker in charge of connecting publishers and subscribers.
HTTP, if your device uses HTTP, user can select HTTP connectivity and then click the Save button. HTTP is an application layer network protocol that is used to assist the process of exchanging data on the internet between computers with one another.
The lora network consists of end devices and gateways and is divided into three classes with definitions as class A, class B, and class C which are two-way communication.
two-way communication with each device to send data, followed by two downlinks receiving short windows. Transition slots are scheduled by device and have the lowest power consumption.
two-way communication with scheduled slots receive, class B opens more receive windows. Thus allowing the device to synchronize the time from the gateway and notify the server when the device is operating.
two-way communication devices receive a maximum slot and almost have a slot receive window that opens and closes continuously when transmitting data, thus consuming more power, so it has the advantage of being able to communicate in real time.
Over-the-air activation, which involves direct communication between server and end device.
Involving new end devices which were added without existing keys, such as AppEUI, devEUI, etc.
There are 2 options in it, including the following:
Make sure the data generated by the system and input into the end device. Then press the send button.
In OTAA Parameter custom, users can manually enter the final device parameters into the system.
Application EUI is a unique ID of the application server, obtained from the IEEE EUI64 standard that identifies the entity to connect to the network, Application EUI is stored on the end-device. Each application server will have a unique Application EUI ID. Application EUI can be generated by the Telkom IoT Platform, commonly called inherit or can also use the manual method, namely custom.
Device EUI is like a Mac Address, or a unique code of the end device that follows the Lora alliance standard and is used to identify the device.
The Application Key is the encryption key between the message source behind the Device EUI and the message destination behind the Application EUI. Each key must be unique for each device.
There are 2 options in it, including the following:
Make sure the data generated by the system and input into the end device. Then press the send button.
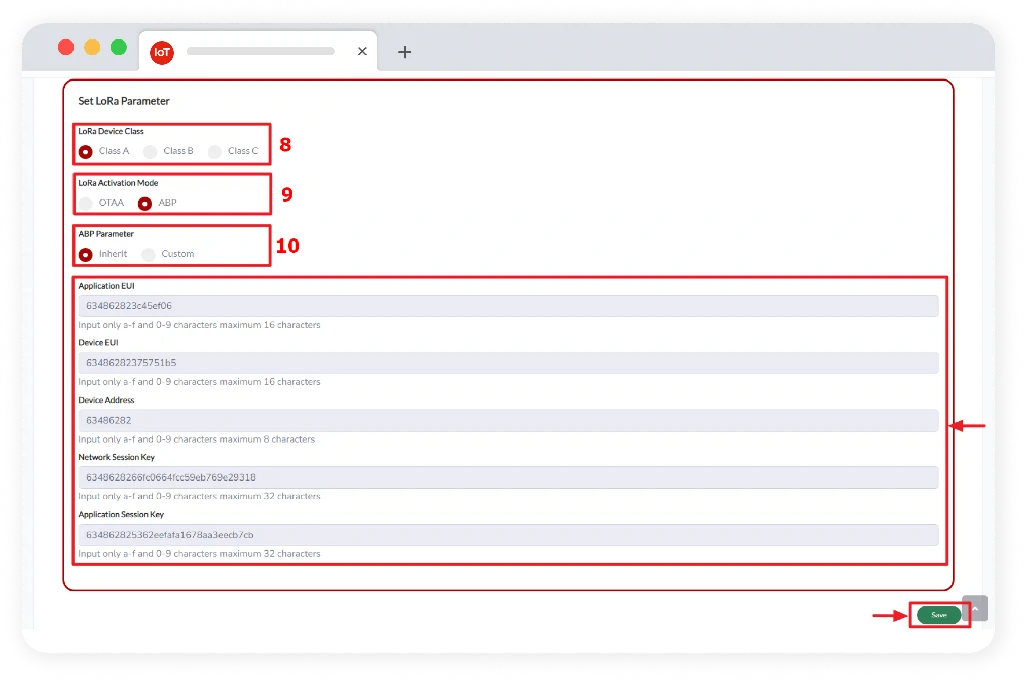
In ABP Parameter custom, users can manually enter the final device parameters into the system.

Application EUI is a unique ID of the application server, obtained from the IEEE EUI64 standard that identifies the entity to connect to the network, Application EUI is stored on the end-device. Each application server will have a unique Application EUI ID. Application EUI can be generated by the Telkom IoT Platform, commonly called inherit or can also use the manual method, namely custom.
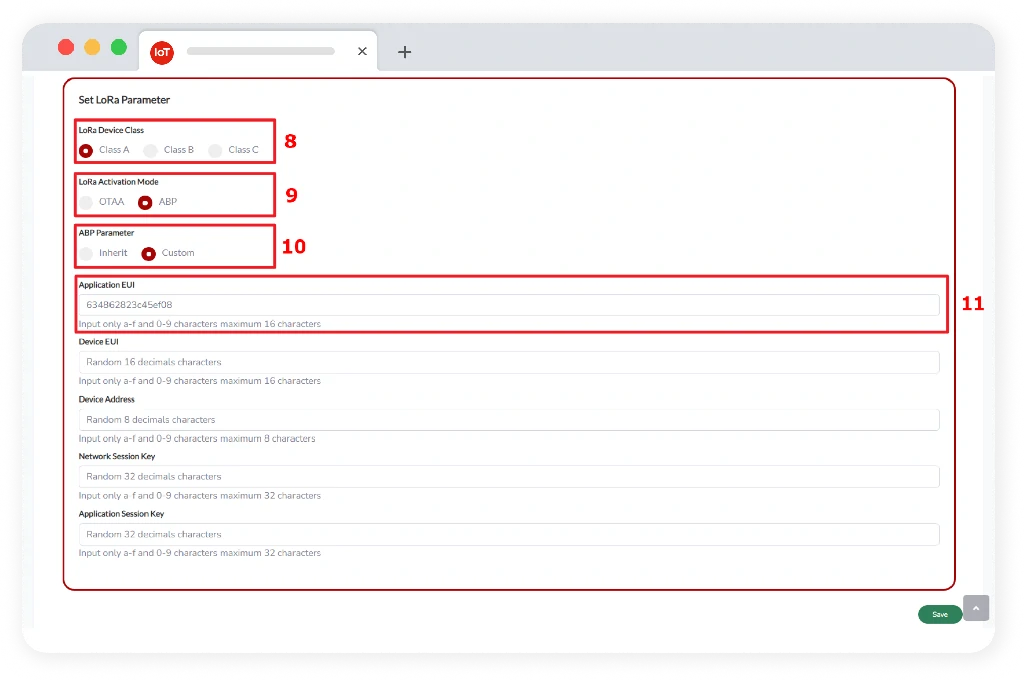
Device EUI is like a Mac Address, or a unique code of the end device that follows the Lora alliance standard and is used to identify the device.
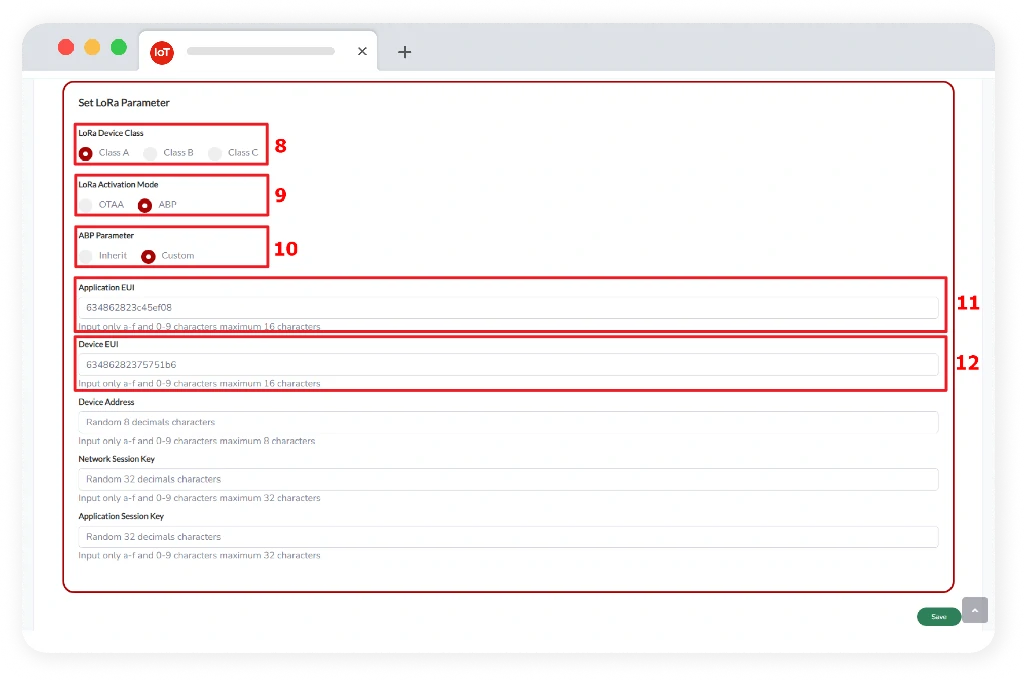
Device Address serves to identify the hardware as an identifier so that each particular device has a unique ID.
Network Session Key (NwkSKey) is used for interaction between Node and Network Server which is used to validate integrity on each message with integrity code on each message.

Network Session Key (NwkSKey) is used for interaction between Node and Network Server which is used to validate integrity on each message with integrity code on each message.
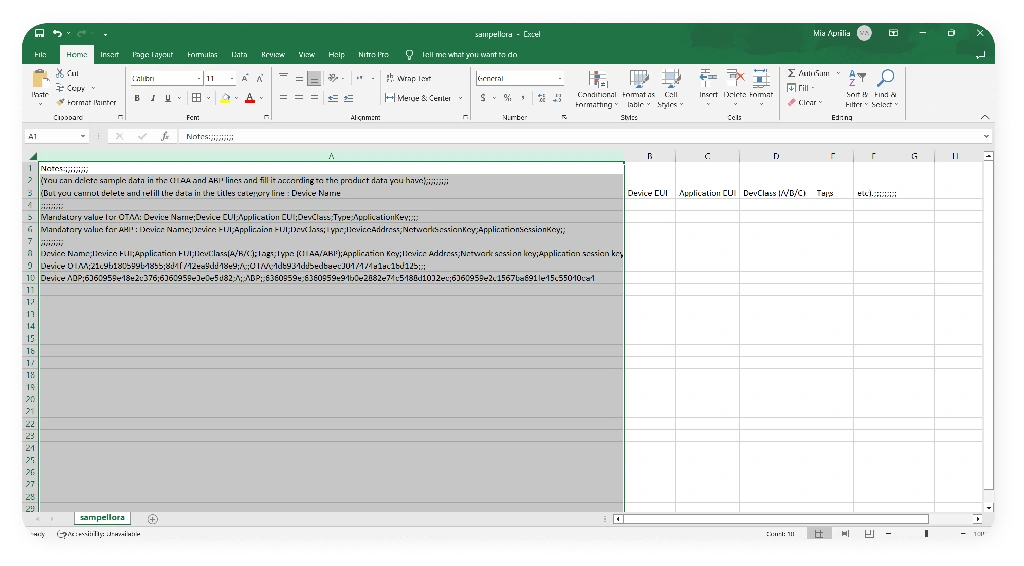
Multiple Device, field that allow user to add more than one device.
Product, is the type of device that will determine the product to be made, including existing product and custom product:
Existing Product, is a type of product which has a decoder that is already recognized by the system.
Product name is the name of the product that is already available.
Connectivity, the type of connectivity will be used for a device. User can choose the type of connectivity such as LoRa, MQTT, and HTTP. If user’s device use the LoRa connectivity parameter, the configuration is as follows:
LoRa (Long Range) is a low-power long range wireless radio frequency technology.
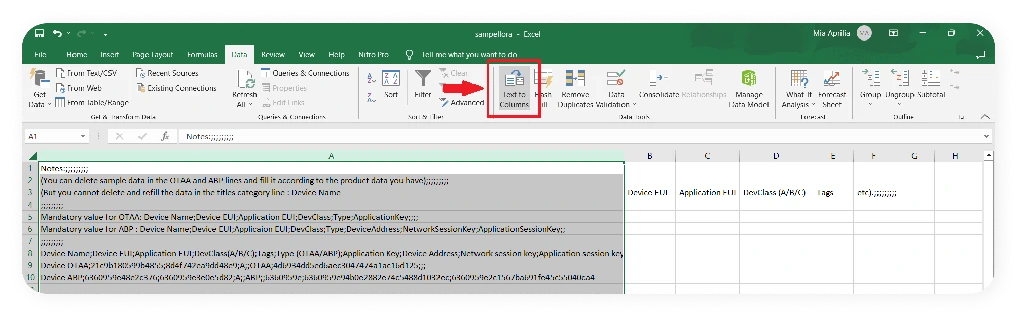
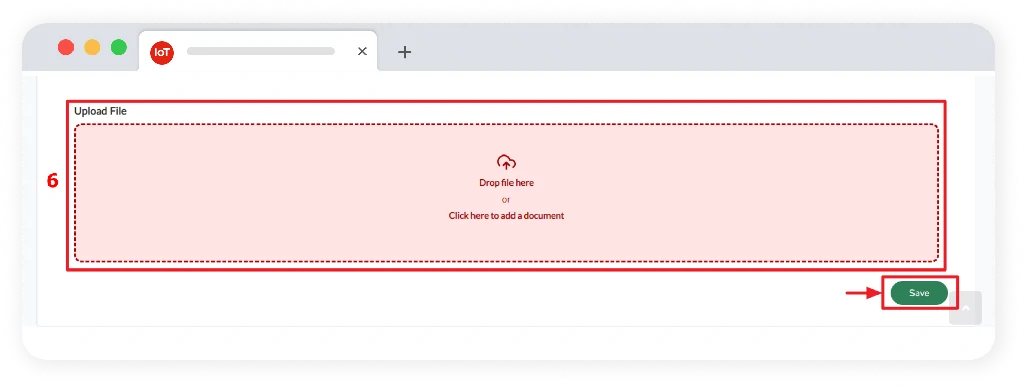
Download .csv file, fill in the fields according to the list in the .csv file.
After the writing format is arranged correctly, next is to do the following steps:
First, klik Data menu on the toolbar.
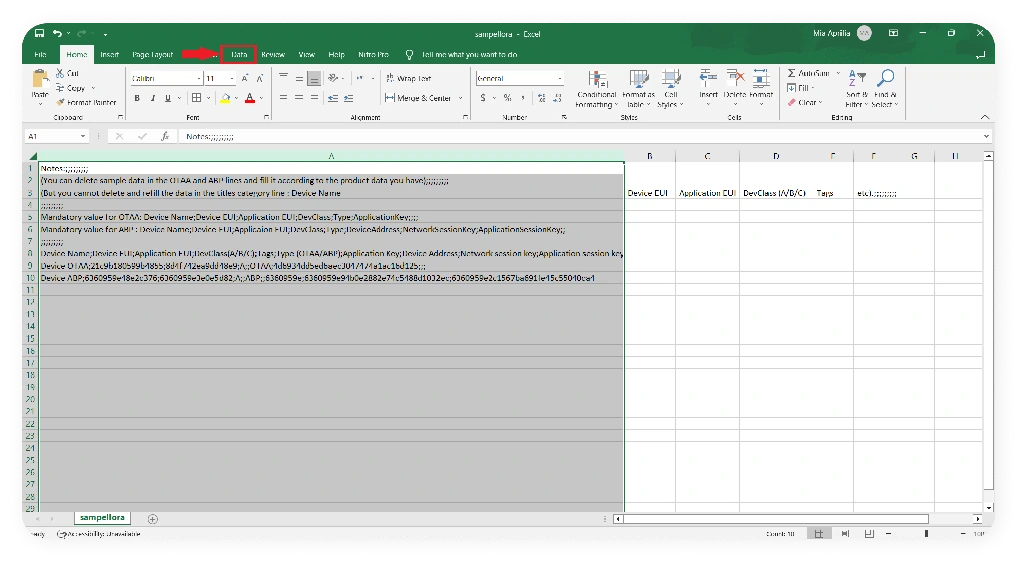
Choose Text to Columns.
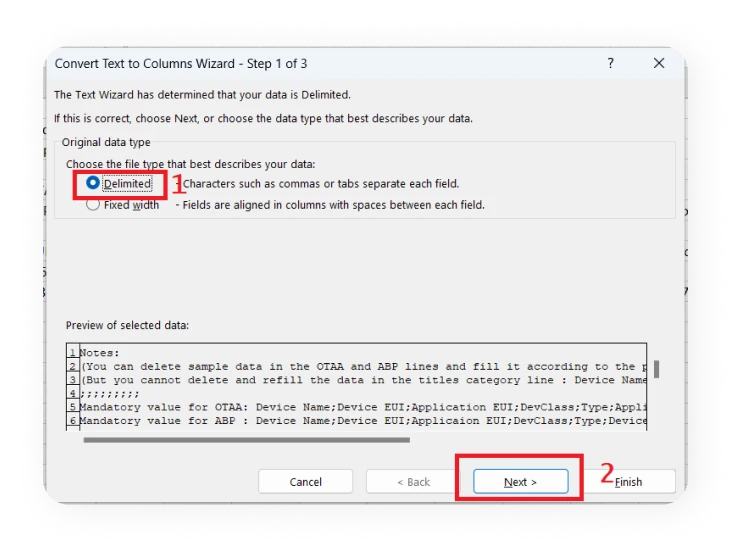
Next, pop up will appear as below. Choose Delimited and click next.
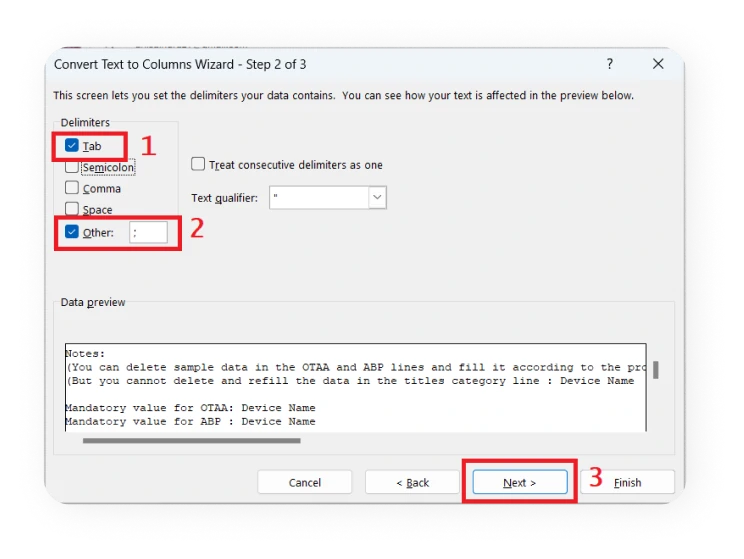
Click the check mark in Tab and fill Other field with character “;”, then click next.
After click Next, pop up will appear as below. You need to click OK as confirmation that you agree to save your file into CSV format.
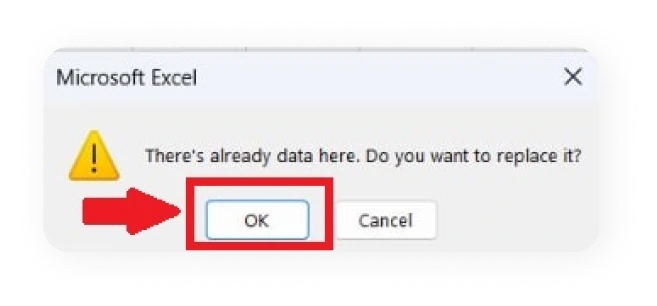
After you click OK, the data will be saved according to the correct CSV format. Now your data can be uploaded to Telkom IoT Platform.

MQTT, if your device uses MQTT, user can select MQTT connectivity then click the Save button. MQTT is a communication protocol that requires small resources and bandwidth. MQTT uses a broker in charge of connecting publishers and subscribers.
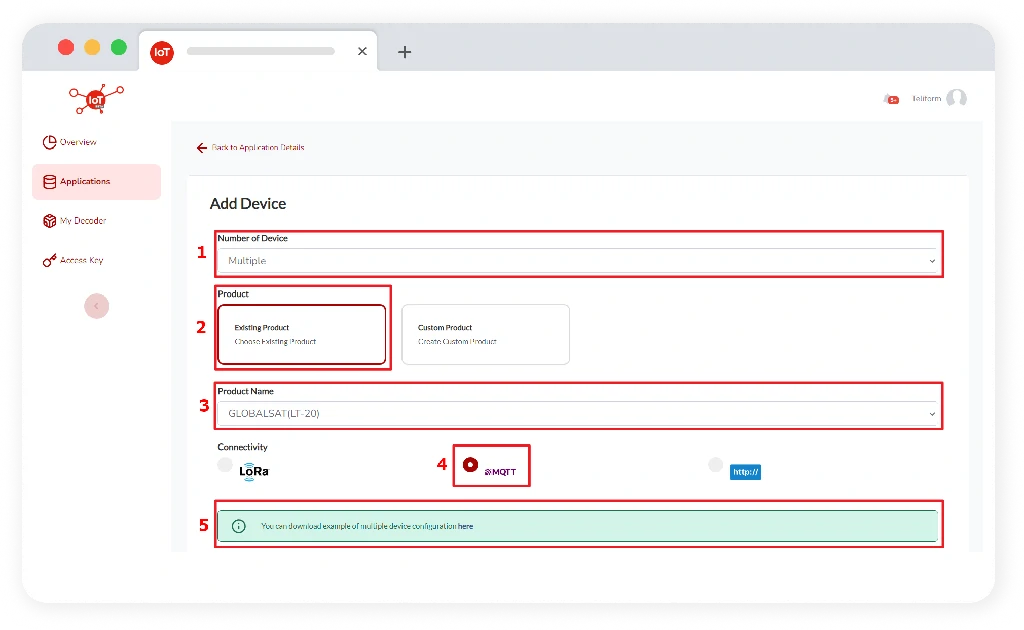
HTTP, if your device uses HTTP, user can select HTTP connectivity and then click the Save button. HTTP is an application layer network protocol that is used to assist the process of exchanging data on the internet between computers with one another.
Custom Product, field that contains user’s settings who have their own devices in the form of decoder.
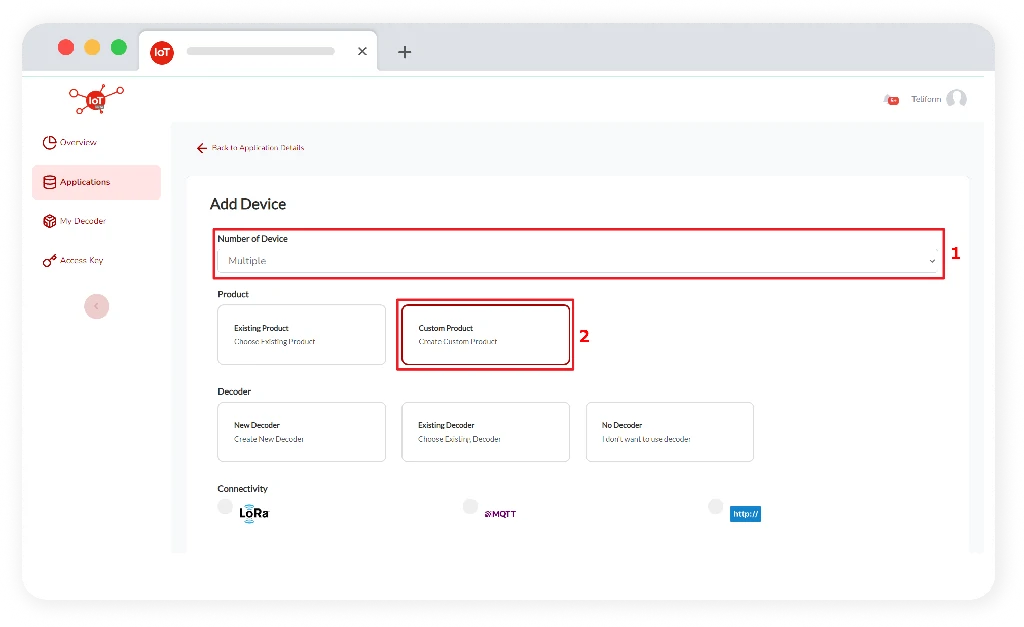
On the new decoder, the user can enter a new decoder that has never been created before. The following are additional data inputs that the user must enter:
The name of the decoder, is the name of the decoder that will be used and is defined by the user.
On the existing decoder, the user can choose a decoder that has been made previously on the existing decoder, the user can choose a decoder that has been made previously. Device name, is the name of the device which will be used and specified by the user. The following are additional data inputs that the user must enter:
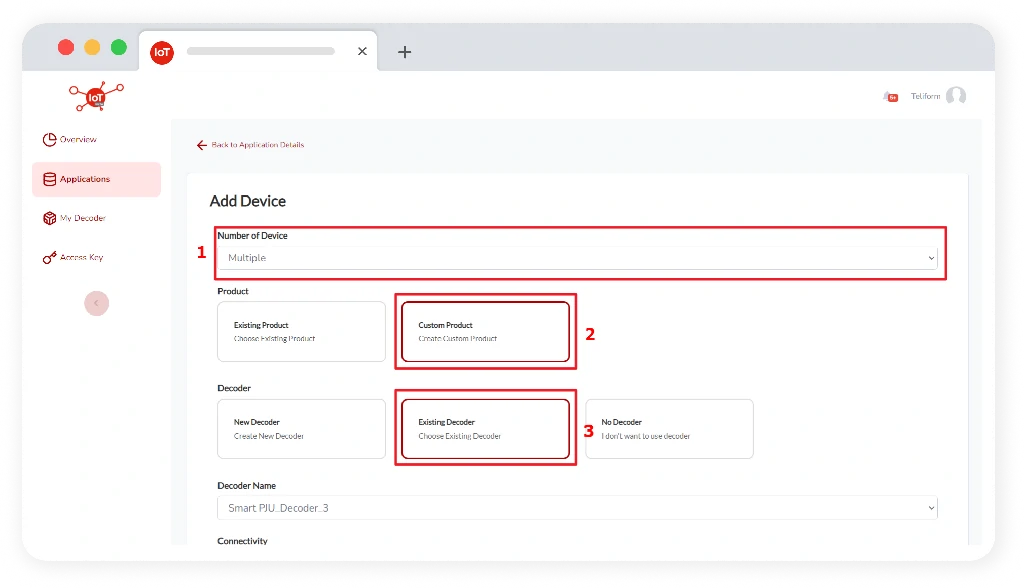
The name of the decoder, is the name of the decoder that will be used and is defined by the user.

On no decoder, user can create device but no decoder added.
Connectivity, the type of connectivity will be used for a device. User can choose the type of connectivity such as LoRa, MQTT, and HTTP. If user’s device use the LoRa connectivity parameter, the configuration is as follows:
LoRa (Long Range) is a low-power long range wireless radio frequency technology.
Download .csv file, fill in the fields according to the list in the .csv file.
After the writing format is arranged correctly, next is to do the following steps:
First, klik Data menu on the toolbar.
Choose Text to Columns.
Next, pop up will appear as below. Choose Delimited and click next.
Click the check mark in Tab and fill Other field with character “;”, then click next.
After click Next, pop up will appear as below. You need to click OK as confirmation that you agree to save your file into CSV format.
After you click OK, the data will be saved according to the correct CSV format. Now your data can be uploaded to Telkom IoT Platform.
MQTT, if your device uses MQTT, user can select MQTT connectivity then click the Save button. MQTT is a communication protocol that requires small resources and bandwidth. MQTT uses a broker in charge of connecting publishers and subscribers.

HTTP, if your device uses HTTP, user can select HTTP connectivity and then click the Save button. HTTP is an application layer network protocol that is used to assist the process of exchanging data on the internet between computers with one another.
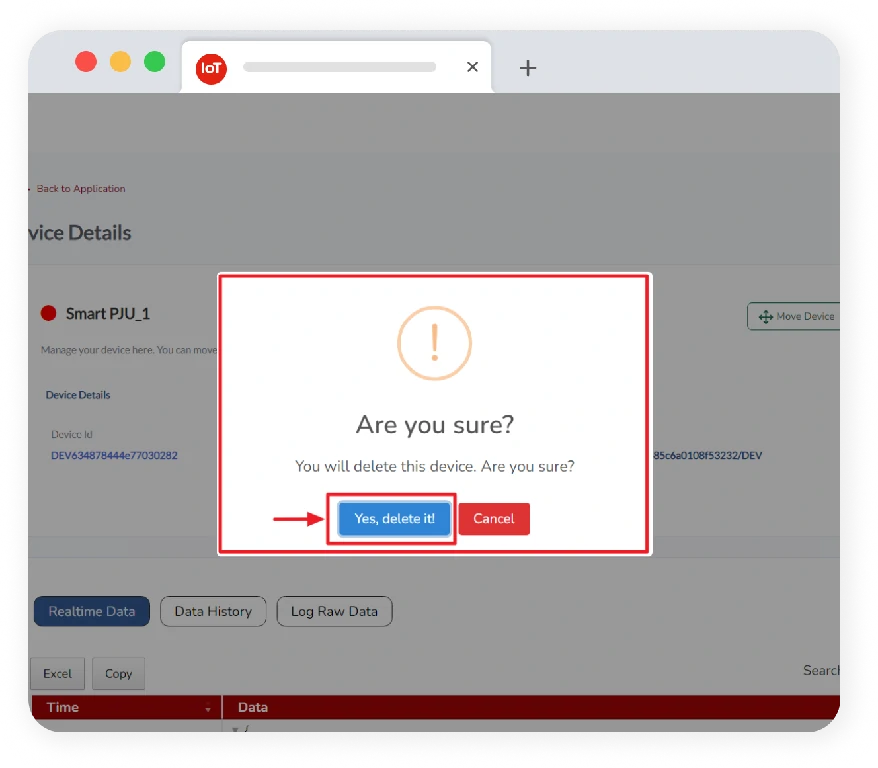
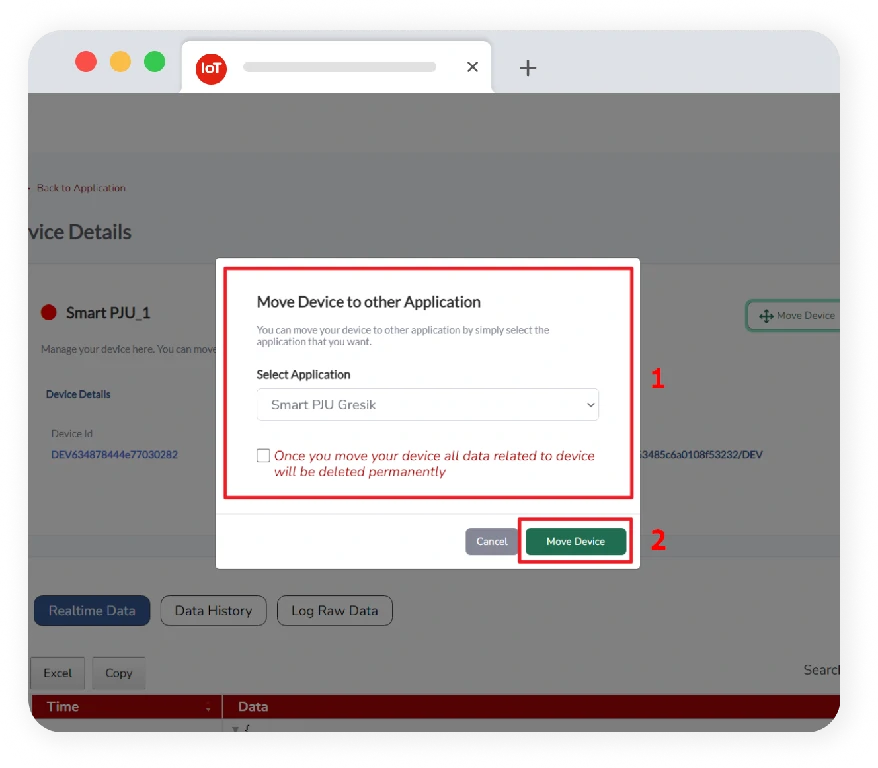
Devices that have been created by users can be managed in the form of edit, delete, and move. When a list of devices appears in the app, the user selects one of the devices to select. Device details will show some of the managed devices that can be changed, deleted, and moved.
.webp)
.webp)
Users can update/edit a single device within the app by selecting the edit button.
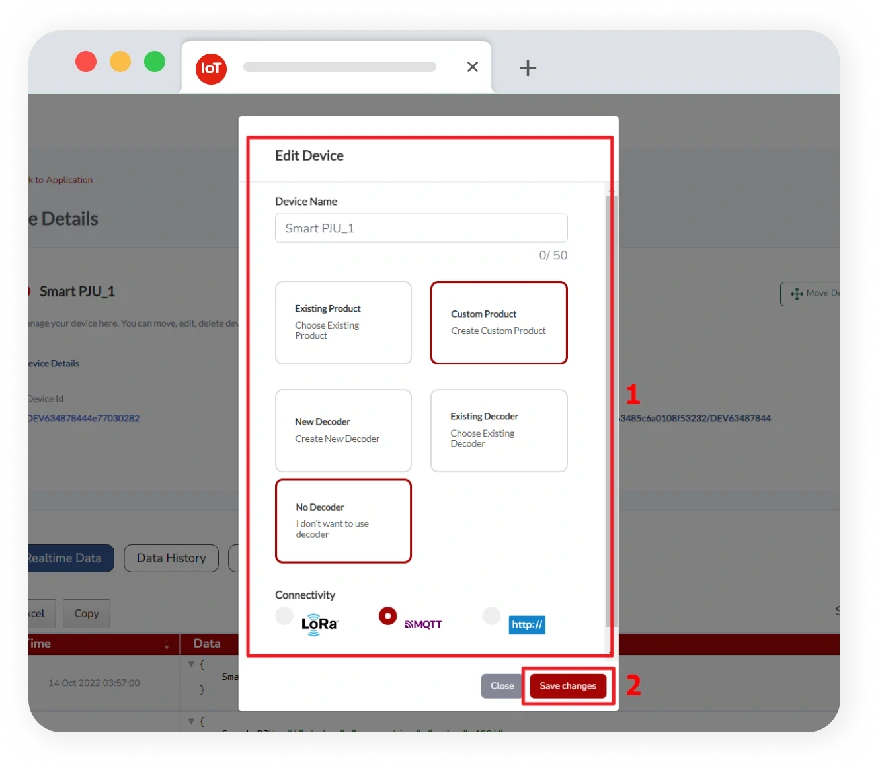
Users can delete a single device in the application by selecting the delete button.
User can move one device in an application to another application by selecting an application.
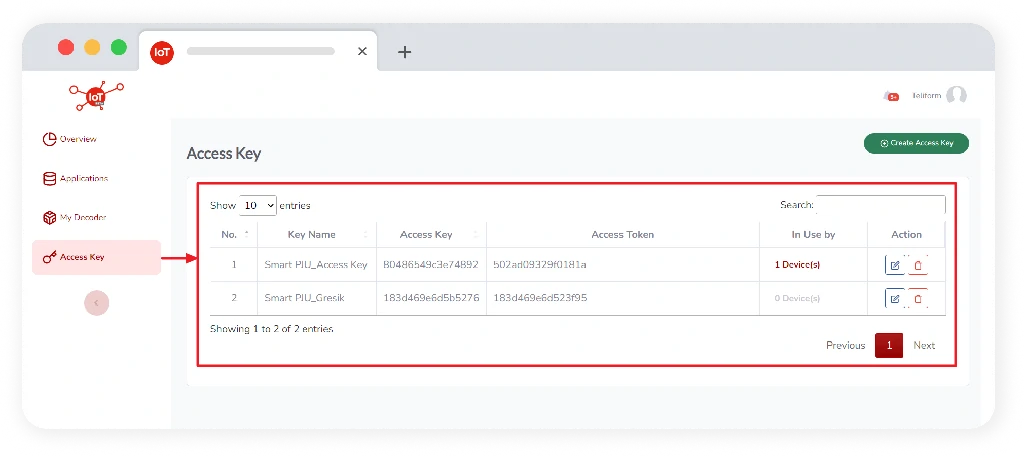
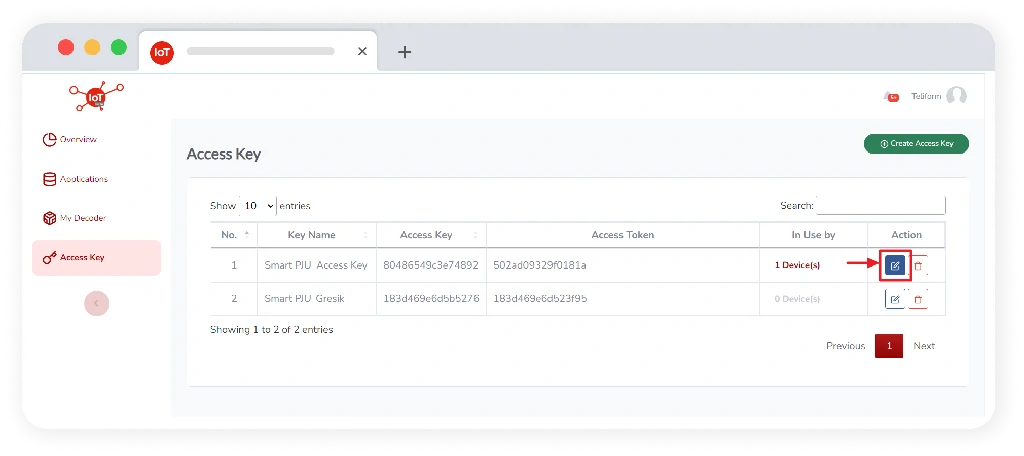
Access keys in the Telkom IoT Platform are used as authentication for devices with LoRa, HTTP and MQTT connectivity.
Access key has several fields that the user must input in the form of Key Name, Access key and Access Token. The following is an explanation of the fields required to be input by the user:
.webp)
.webp)
Access Key List is a list of Access Keys that has been inputted by the user.
In the Edit Access Key, users can select one from the list of access keys that they want to edit/update the previously submitted data by clicking the edit button.
In Delete Access Key, users can select one from the list of access keys they want to delete previously submitted data by clicking the delete button.
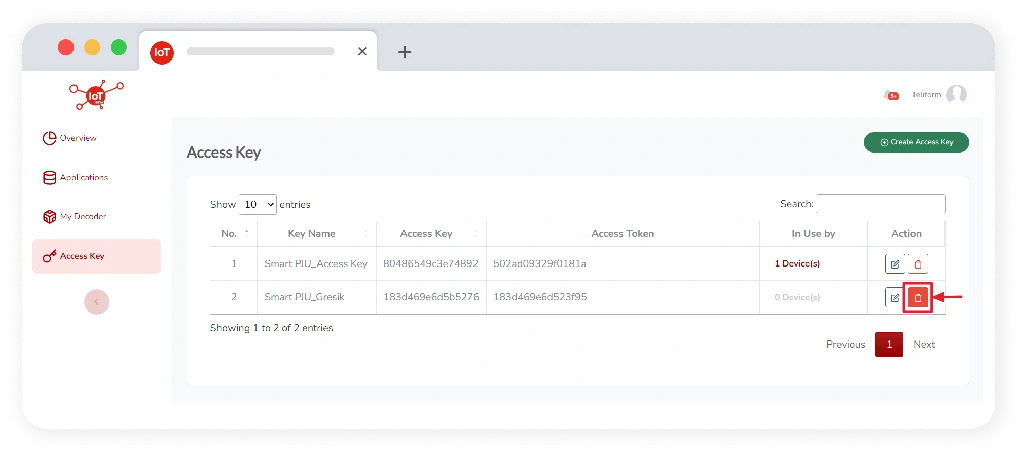
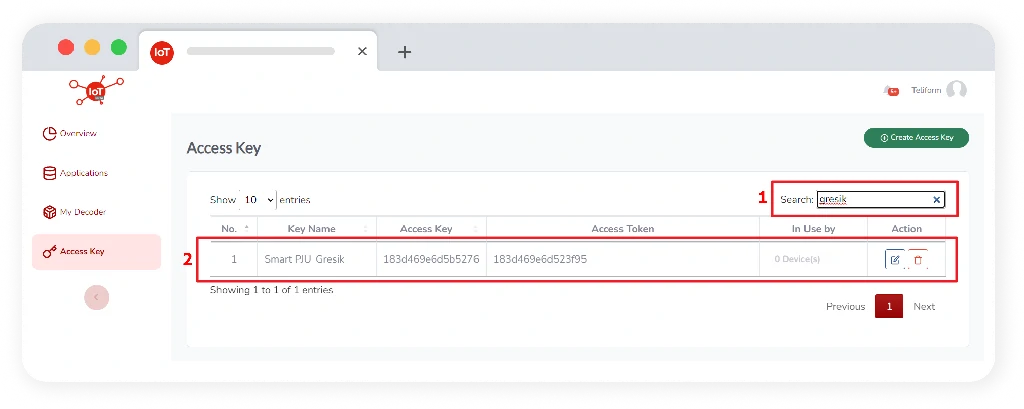
In the Access Key Search, users can enter the data keywords they want to search to make it easier for users to search for access key data, if the access key list is large.
The Telkom IoT Platform offers several benefits as a liaison for IoT devices and various related sources.
The implementation of MQTT by the Telkom IoT Platform has several benefits, including:
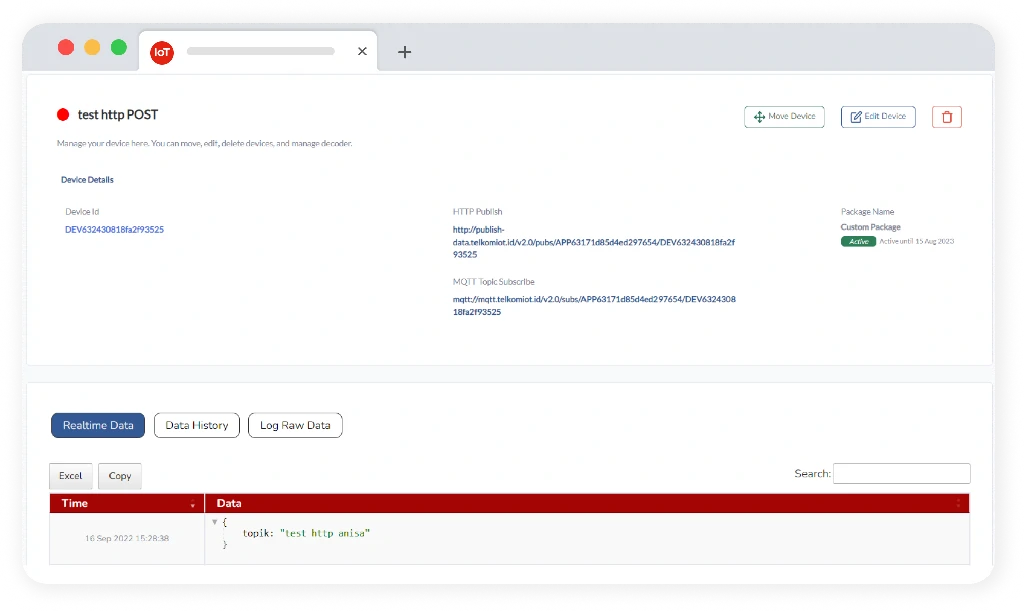
Users are required to have a Telkom IoT Platform account and perform the Sign in process. Go to the Telkom IoT Platform dashboard, create an application and create a device like the example on the following image:
On Add Device Page, input parameter number of device (Single), Product (Existing product), Product Name, Device Name, Connectivity (MQTT) and click Save button. Then create Access Key and Access Token with described steps in section Create Access Key with steps described in the Create Access Key section.
Open Node Red and Double click Node inject for configuration node, and set node inject as follow:
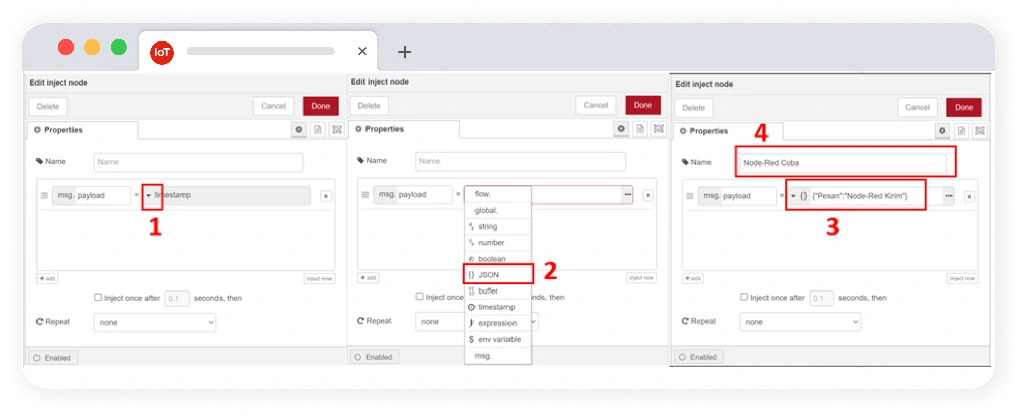
Configuration node inject with type data JSON, then fill in the message as you want (The example in the Picture message contains “{"Message":"Node-Red Send"}”), then fill in the field name as you want (The example in the picture message contains “{"Message":"Node-Red Test"}”) then click Done when the configuration is complete.
Then Double click Node MQTT Out to configure the node, then configure the node as shown below:
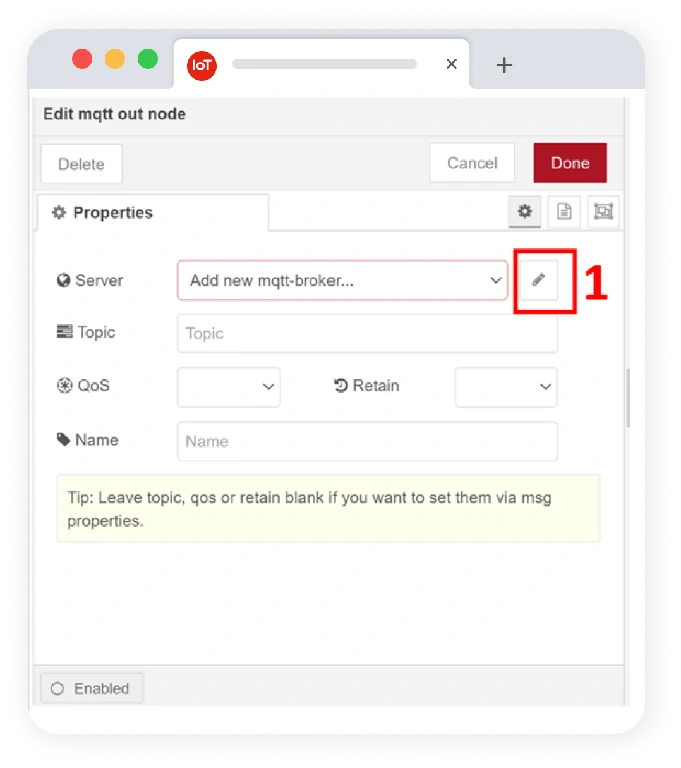
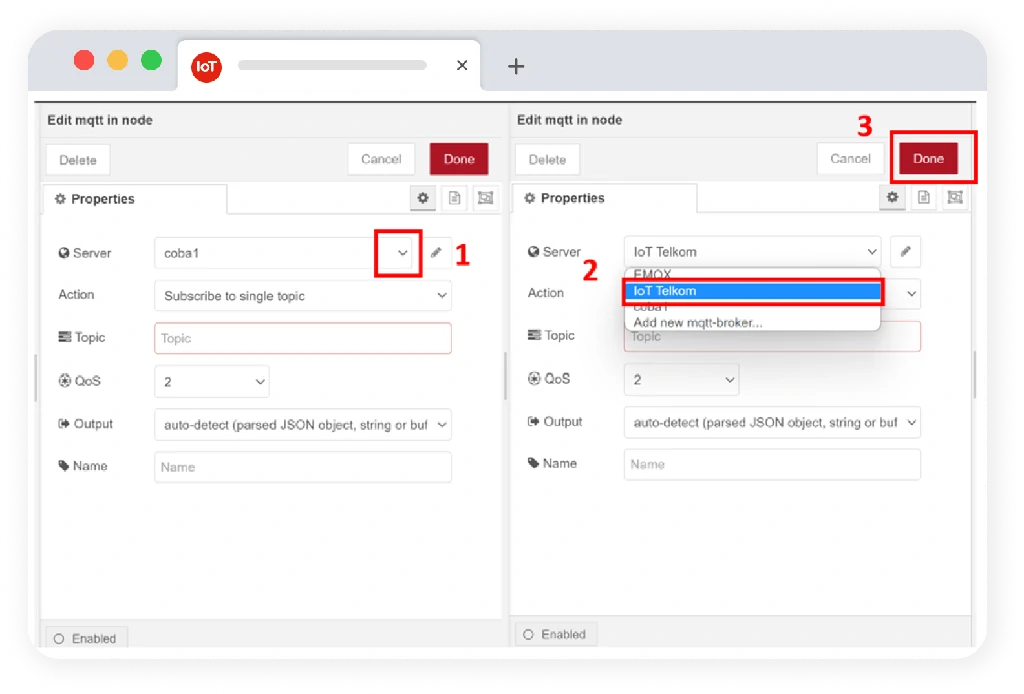
Click the Pencil Icon as shown in the image for the MQTT Broker configuration use, on this stage, prepare the Device that has been created on Telkom IoT Platform.
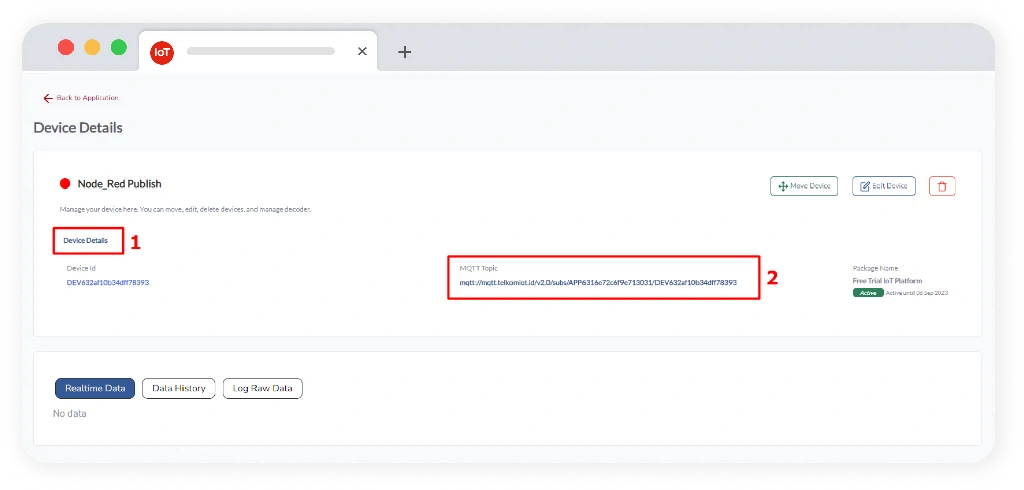
Open the previously prepared Device, then copy the HOST Broker (mqtt.telkomiot.id) contained on the detailed device as shown in the picture.
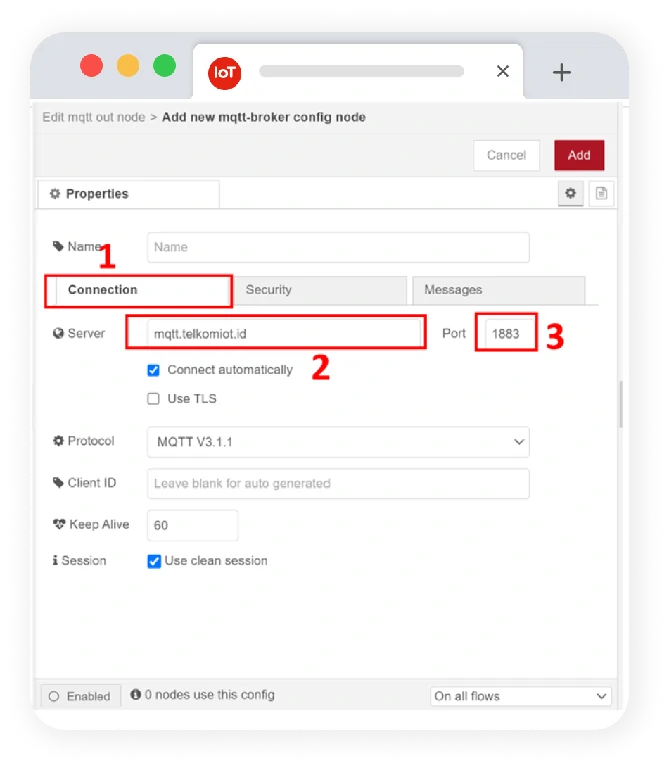
After Host is copied, Enter the Node-red broker configuration as shown in the picture, select menu Connection, configuration host then configuration port with value 1883 (port default mqtt).
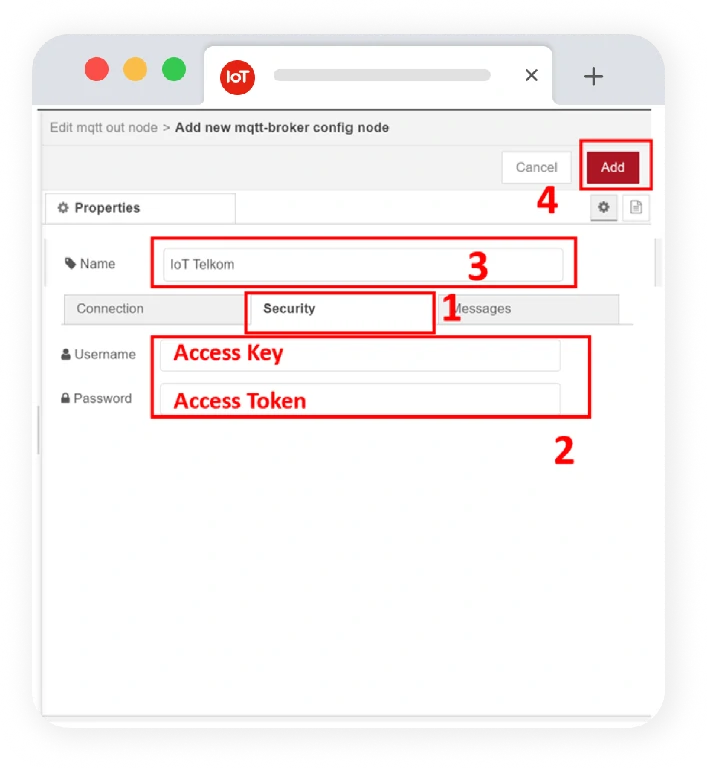
After that, select the Security menu then enter the value Access Keys and Access Token.
Input Access Keys to field User name, and Access Token to field Password, if it’’s already inputted, edit name Broker Host (example on picture above : IoT Telkom), then click Add.
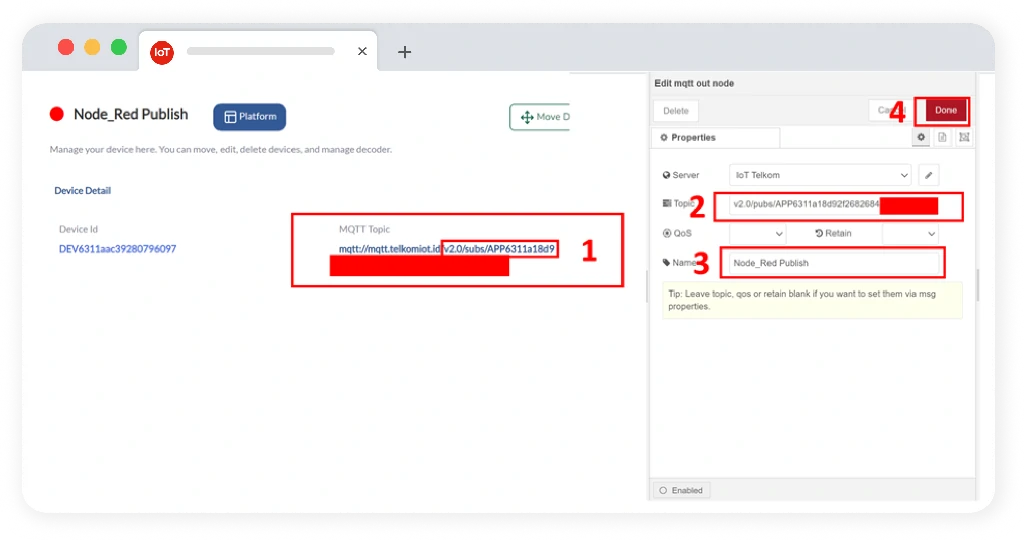
If successful, then the display will appear as shown in the image below, then enter the topic from Device Details on the IoT Platform (Note : Edit subs to pubs for publish) input Field name as desired (example : Node_Red Publish), and click Done.
When configuration is done, click deploy and make sure the MQTT Node is connected.
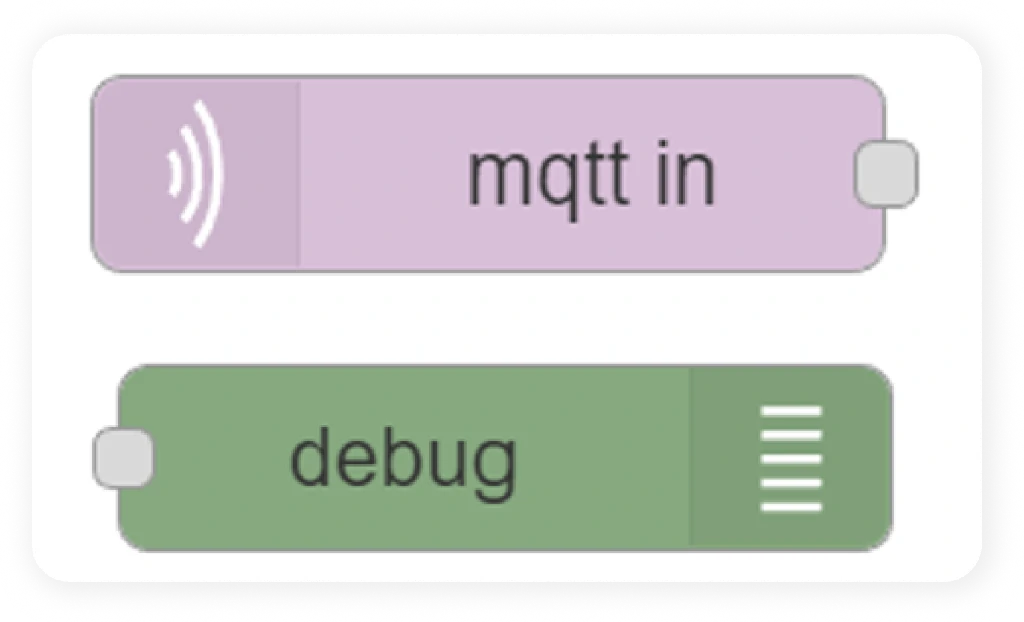
Open Node-Red in Browser, create a Flow with node MQTT In , and debug as shown in the picture below.
Create a Flow by connecting each node as shown below:
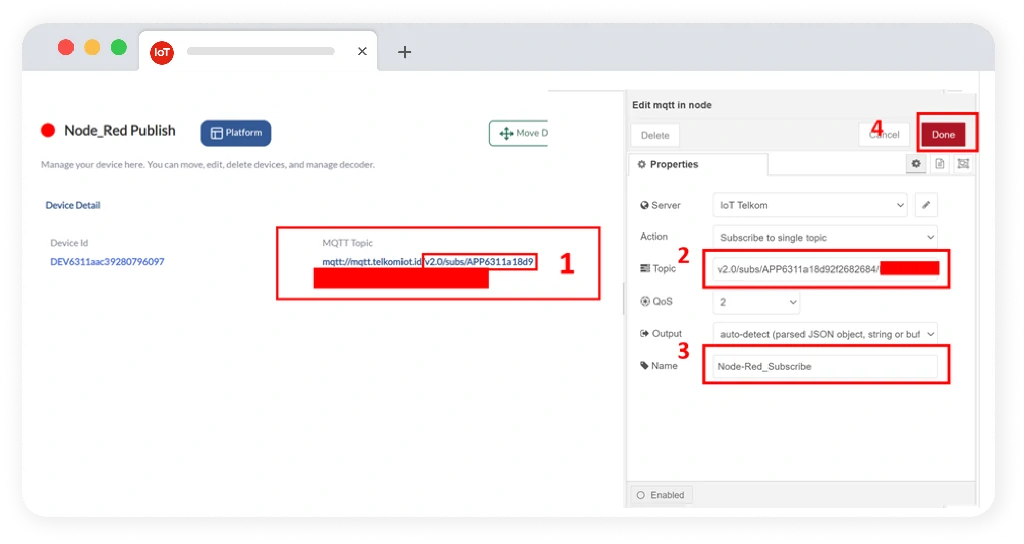
Double click node MQTT In, then configure the node according to the broker used, if using the same broker as the previous publish method, the configuration is immediately available and can be selected.
After you finish configuring the MQTT broker, then use the Subscribe topic on the IoT Platform, then enter it in the Topic column as shown in Figure:
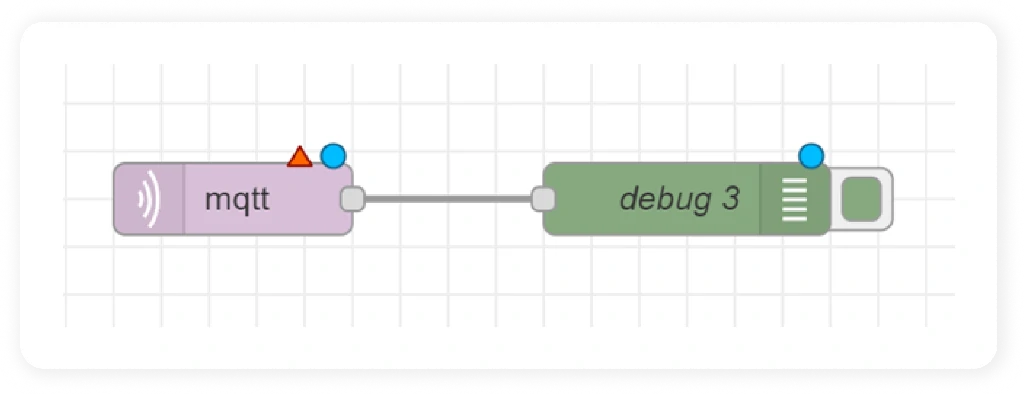
After finishing, deploy the configured flow and make sure the MQTT node is connected as shown in the picture.

If the Flow has been configured and deployed, the next step is to validate the data sent from the message publisher to the message subscriber with the Telkom IoT Platform Broker.
Open Node-Red that has been configured, then prepare the available debug window.
Make sure the publisher sends a message to the Broker. If the publisher sends a message to the IoT platform, a message that is subscribed from the Telkom IoT Platform will appear as shown in Figure.
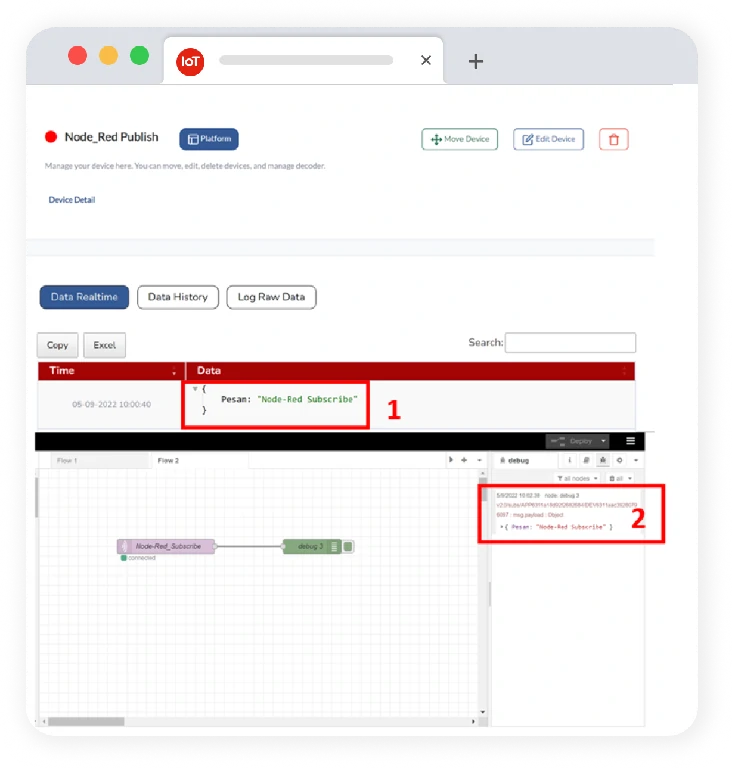
If the message on debug already appears, make sure the message on the IoT Platform is the same as that shown on debug.
Integration using LoRaWAN is a network designed to connect user devices that use LoRa support. After successful integration using LoRa, users can connect, communicate, process and visualize data from devices available on Telkom IoT Platform.
Integration using HTTP can convert protocols and has a payload format that is in the message format owned by the Telkom IoT Platform and serves as an implementation scenario as follows:
Users are required to have a Telkom IoT Platform account and perform the Sign in process. Go to the Telkom IoT Platform dashboard, create an application and create a device like the example in the following image:
In Add Device Page, input parameter number of device (Single), Product (Existing product), Product Name, Device Name, Connectivity (HTTP) and click Save button. Then create Access Key and Access Token with described steps in section Create Access Key section.
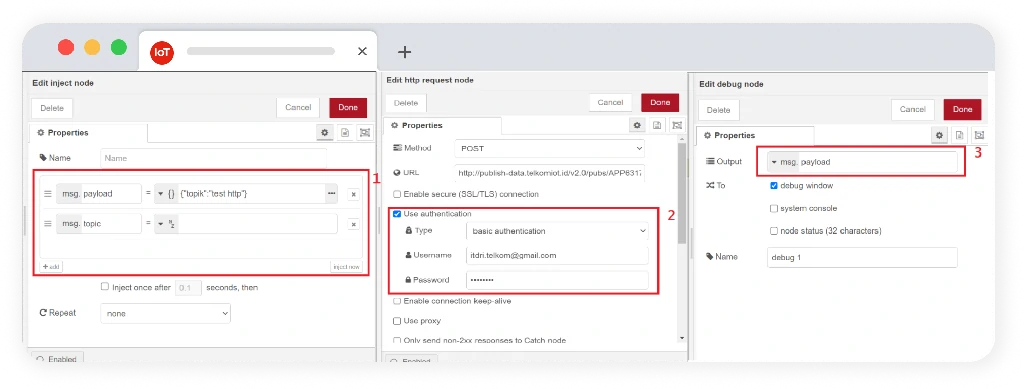
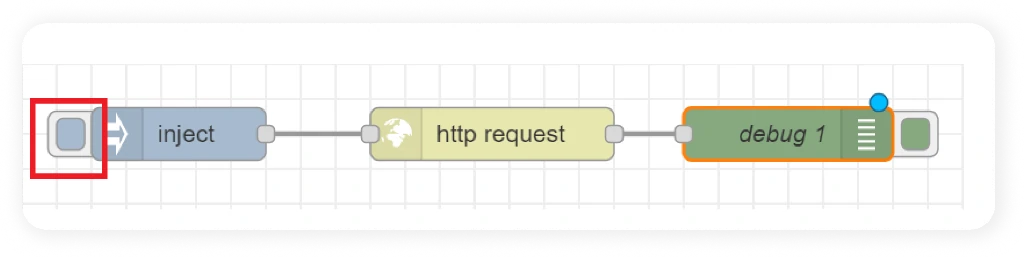
Open Node Red and Double click Node inject for configuration node, and set node inject as follow:
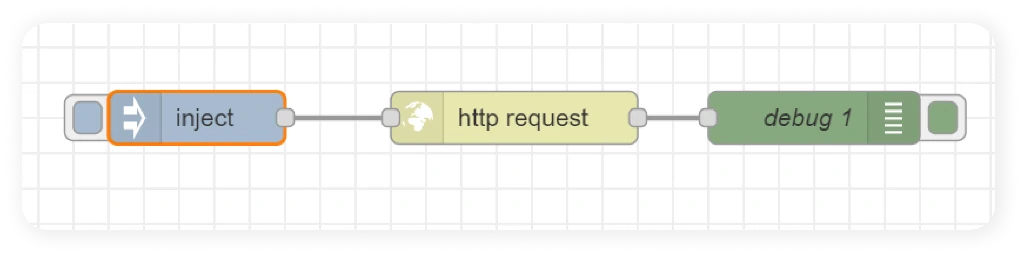
Set configuration Inject, http request and debug 1 match with users. detail.
Click the Inject button to send data
See the details of device on Telkom IoT Platform account.